How to Change the Default WordPress Upload Folder Location – WordPress has a powerful media upload feature that can be used to upload various kinds of files, both images, videos and other types of files. All files uploaded to the WordPress website are stored in the Media Library which you can easily access through your admin area under the Media »Library menu.

Various files that you have uploaded to the media library on your WordPress site will be stored on your hosting platform and located in a folder or directory (wp-content / uploads ). Some WordPress users may want to rename the default WordPress upload folder to something other than the user wants. However, this cannot be changed easily because after the release of WordPress version 3.5, the feature to change the upload directory path in the Settings menu is no longer present.
Read: Remove or Rename Uncategorized Categories in WordPress
If you currently want to change the default folder name, you don’t need to worry because in this article I will give you a guide on how to change the location of the default WordPress upload folder to your liking.
How to Change the Default Media Folder in WordPress
There are various reasons why a user might want to change the default WordPress upload folder or directory. In terms of increasing WordPress speed performance , it is possible to host images on a subdomain, also making backups more efficient. Changing directories can also create a different URL structure and organization for media files.
The method is quite easy, please open your wp-config.php file, the wp-config file is found in your best web hosting cPanel file manager. After that, please add the code below. You can replace the word “my picture” in the code according to your wishes.
define('UPLOADS', 'wp-content/gambarku');
Make sure you add the code above before the line:
require_once(ABSPATH.’wp-settings.php’);
If the folder in wp-content doesn’t exist, WordPress will automatically add it. You can also add it manually according to what you want to create, but make sure it matches the folder name in the code above.
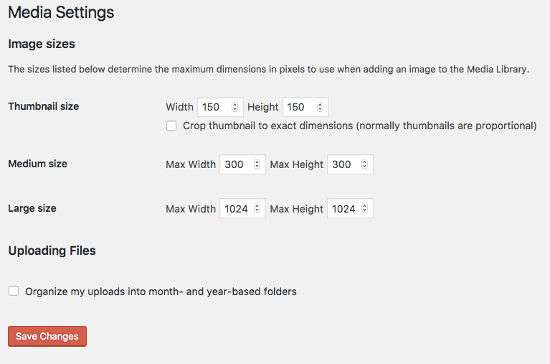
You can also change the upload method settings. If you open your uploads folder you will see that the files are, by default, sorted by year. You can change your file organization so that all media files are placed in one folder. Please set it in the Settings »Media menu and uncheck” Organize my uploads into month- and year-based folders . ”

Unchecking the above will not only make your URLs simpler but will also make it easier to view your files in one place instead of having to sort through the months and years of each folder.
After all the settings above are complete, please upload the image to your WordPress site and see the changes that occur, so now the file you uploaded has a different URL and is entered in the folder you adjusted.
Important : If you rename your default WordPress folder when your site has been running for several months and has some files saved, then your images will not appear. This happens because the URL has changed. You can quickly change the URL using the Velvet Blues Update URL plugin, which you can read the tutorial in the link below.
And above is an easy way to rename the upload folder or change the default folder location in WordPress to your liking. Hopefully this article is useful and good luck. 🙂


