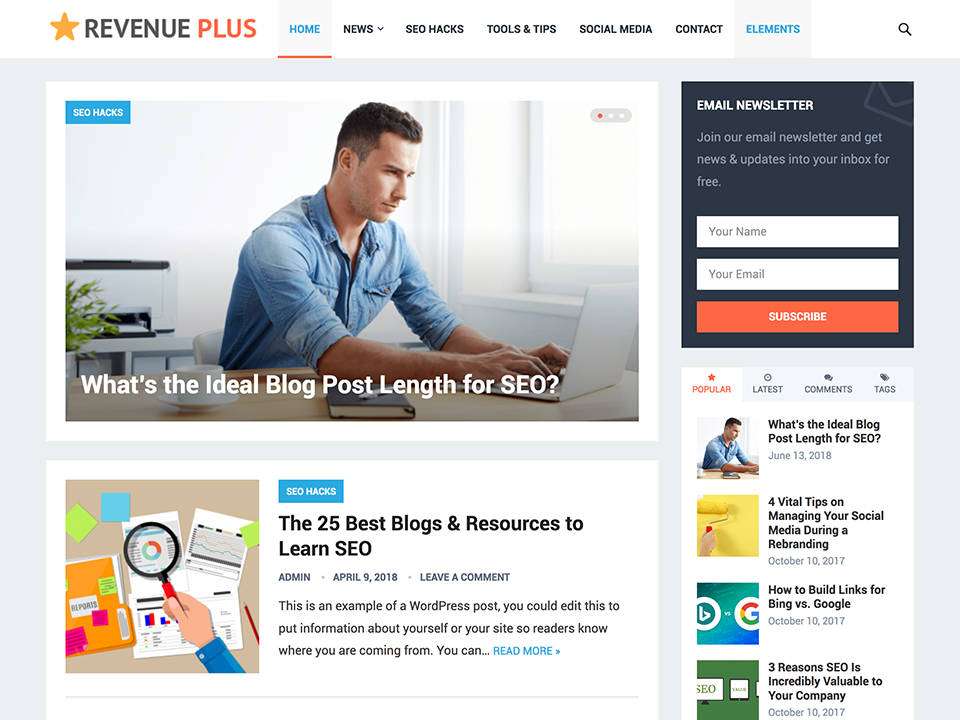
The WordPress Revenue Plus theme is a WordPress theme for bloggers who want to maximize revenue from advertising, especially AdSense ads. This theme is really good in terms of a minimalist, clean and modern two-column design. This theme is also very light and fast to load, so it doesn’t leave your visitors waiting long.
The theme of Revenue Plus is that many bloggers are interested and finally bought the premium version which I sold at a very cheap price of only Rp. 69,000 only and will get updates forever (no annual fee). Another interesting thing about this theme is of course the large number of advertising areas that are provided with strategic places.
If your blog is full of visitors, this will attract the attention of advertisers to rent banner ad space on your blog and you will quickly and easily set it up. Also, if you are looking for income from Google AdSense, this will be perfect for you. The Revenue Plus theme will increase your income, increase CTR and CPC because ads can be displayed in many places but do not disturb readers, besides that the place of the ad is also very strategic so that the possibility of being clicked will be very large.
Revenue Plus Theme Features
RevenuePlus is a premium WordPress magazine magazine theme best suited for new WordPress users, PRO bloggers, SEO marketers and businesses. This theme is fully responsive & mobile friendly which works great on all types of devices (desktop, tablet and smartphone).
Header
In this header section you can display your website logo clearly. And next to it you can display a simple menu and sub menu that is equipped with beautiful animations. And don’t forget the search icon next to the end of the header which when you click it will bring up the search field. This theme header also has a sticky feature, so that when your web page scrolls it will still float at the top.
Slider
On the Revenue Plus Themes homepage to make this theme look more lively and interactive, it brings a large slider feature. You can display your headline content on this part of the slide so that it attracts the attention of your visitors. For the premium version you can add as many slides as you like. This slide is made with a snug design and is very light.
Custom Fonts
You can also easily change the font according to your taste by simply selecting an available font by scrolling through the font list from the Google library, so there are around 300+ fonts available. There is no need to manually install fonts by entering the font code in the theme code, everything can be done from the Customizer page.
Custom Color
This theme supports customization of the main and secondary colors according to your wishes. This Color setting will change the color of categories, buttons and links. Everything can be arranged as easy as clicking through the Customizer page.
Widget
This Revenue Plus theme brings 9 very important built-in widgets such as: Advertisement, Category Post, Most viewed Posts, Newsletter, Popular Posts, Random Posts, Recent Posts, Social Icons, and Tabs. And also has several widget areas like Sidebar, Sidebar Homepage, and 4 Column Footer.
Advertising
This Revenue Plus theme features many and varied ad areas, all ad areas are placed in strategic places but don’t disturb the readers on your site. The available advertising areas are in the section:
- Sidebar: The ad area in the sidebar can be added as many times as you want with the Advertisement widget.
How to Install and Use Revenue Plus Themes
How to install this Cheap Premium WordPress Theme is very easy like installing a WordPress theme in general.
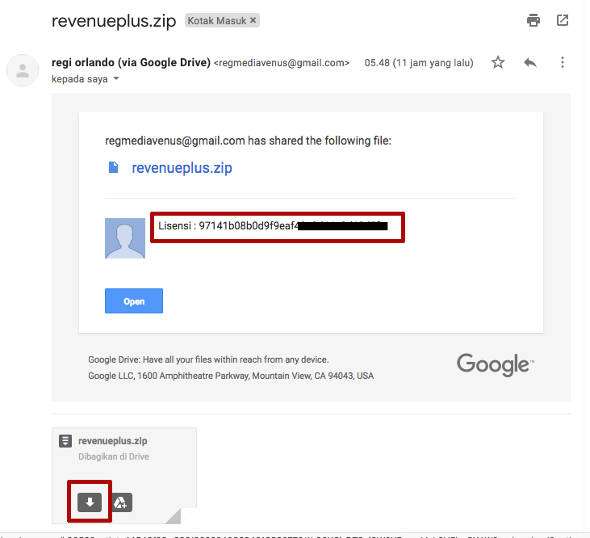
First , after you download the Cheap Premium WordPress theme from WP Radar and get a license, please save the WordPress theme file and license on your computer.
To download it is very easy, after you transfer money and check it, you will get an email containing the download file and license, just click the download icon as I have marked red. The email will look like the image below:
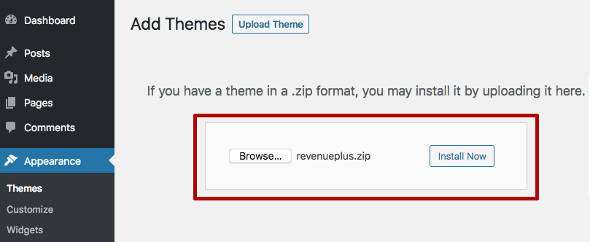
Second , please enter your WordPress admin and click the Appearance menu → Themes → Upload Theme . Click the browse button .. and locate the WordPress theme file that you downloaded earlier on your computer and click the Install Now button.
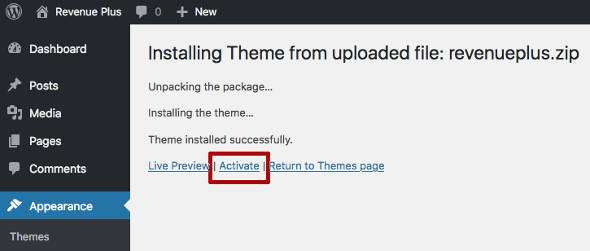
Third , after the installation of your WordPress theme is successful, please click the Activate link to activate the theme so that it is applied to your site.
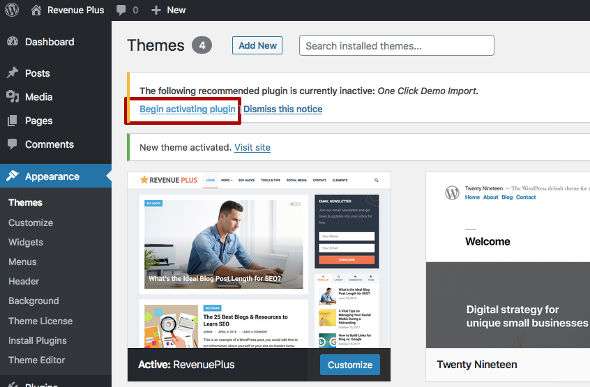
Fourth , after you activate the premium WordPress theme, you will see a notification at the top to install the “One Click Demo Import” plugin. Please click ” Begin activating plugin “. Please install and activate the One Click Demo Import plugin.
Important: This plugin is useful if you want to show your theme like a live demo and it will make it easier for you to configure the theme. But if you want to configure and manage everything yourself, then this isn’t necessary.
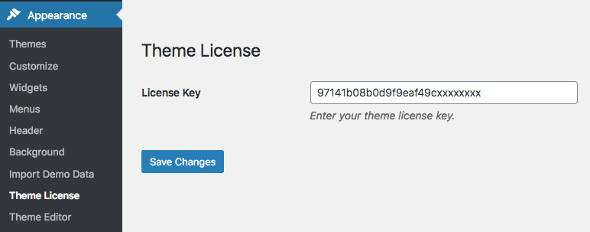
Fifth , now is the time for you to activate the license on the WordPress theme by going to the Appearance → Theme License menu. Please enter the license key that has been given by center, click into the License Key column and activate it.
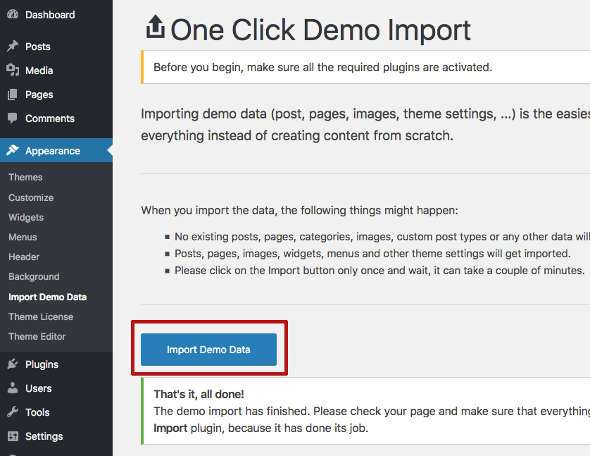
Finally , you can Import Demo Data to match the live demo by clicking the ” Import Demo Data ” button and waiting for the message ” That’s it, all done! “As shown below.
Important: But if your site is live and already has content and is already indexed in search engines like Google, you don’t need to do this. This is required for a new site to make it easier for you to set the site layout according to the live demo.
Done, now you can use the cheap premium quality WordPress theme properly and enjoy all the premium features that the theme brings.
Revenue Plus Theme Settings
- Logo (1): To change the logo, please enter the Appearance menu → Customize → Theme Settings → Logo
- Main Menu (2): To display the menu in Appearance → Menus and Primary Menu location
- Featured Posts (3): To activate slides and display the number of slides in Appearance → Customize → Theme Settings → Display featured content on homepage / Number of featured posts to show
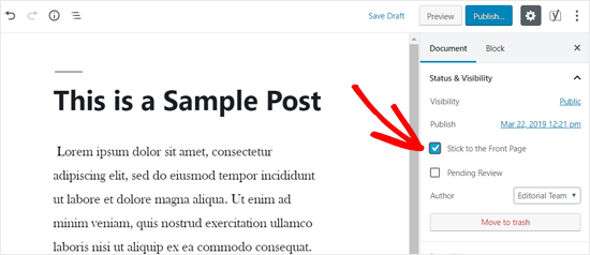
- To make a post appear on a slide, please check the Stick to the Front Page (sticky post):
- Latest Posts (4): Appearance → Customize → Theme Settings → Latest Posts Style / Number of words to show on excerpt
- For how to change the amount displayed in Latest Post, enter the dashboard and Settings → Reading → Blog pages show at most
- Sidebar (5): To display widgets on the sidebar in Appearance → Widgets → Sidebar
- Footer Widgets (6): To show widgets on footer or bottom in Appearance → Widgets → Footer Column 1/2/3/4
- To enable and disable Footer in Appearance → Customize → Theme Settings → Display footer widgets
- Copyright section (7): To display copyright text in the Appearance → Customize → Theme Settings → Customize Site Footer Text / Link menu
- Footer Menu (8): To display the menu on the Footer, go to: Appearance → Menus and Footer Menu Location
Additional Features
Theme Colors : To adjust the color of the theme (headlines, links, titles, hover) in the Appearance menu → Customize → Theme Settings → Theme Primary Color and Theme Secondary Color
Font Style : To set a custom Font in the Appearance menu → Customize → Theme Settings → Body Font and Heading Font
Ads Area : To manage your AdSense ads, please go to Appearance → Customize → Theme Settings → AD Settings. And below is an example of an ad area that you can use on Revenue Plus Pro which is marked in red as advertisements.
- Sidebar : The ad area in the sidebar can be added as many times as you want with the Advertisement widget.
If you are using an AdSense ad type or banner that is not responsive and confused about setting your AdSense ad to be in the middle or center position, please read the following article → 2 Easy Ways to Adjust the Position of AdSense Ads in the Middle .
And that’s a complete review and documentation of the Revenue Plus theme, Are you interested in buying this theme? If so then please follow the instructions below.
How to Buy Revenue Plus
- Please select the WordPress theme you want, make sure you check out the demo of the theme to make sure everything fits and works well.
- Please send a message via email to: admin@WP Radar.com
- You will get a quick reply to send a payment with an account number. After the payment is complete, please confirm via email again.
- After payment is checked and correctly entered. You will get a theme file which will be sent to your email.
Want another WordPress theme? Have a look at the following page → 10 Cheap WordPress Themes .


