


Complete Guide on How to Register for Google AdSense [Latest] – For people who want to enter the world of blogging, more of their motivation is because they want to make money rather than a hobby or just share their personal stories. And for most beginners, seeing how to make money from blogs is through Google’s advertising program, Google AdSense.
It doesn’t matter what your motivation is for blogging, indeed AdSense is also the initial driving force for me to start blogging and until now I am also still running the AdSense program on my blog. Here I will explain in full about how to register for Google AdSense and I will explain step by step to make it easier for you.
Note: In this tutorial I am specifically explaining Google AdSense for blogs only, because as we know that AdSense can also be run on the Play Store application and also YouTube videos.
Read: How to Create Email in Gmail with Computers and HP Smartphones
What is Google AdSense?
Google AdSense is Google’s advertising program that allows bloggers and YouTubers to make money by placing ads from AdSense on their websites and videos and earning money when visitors click ads.
Ads displayed by Google AdSense can be in the form of text, images, videos or other forms of animation. Users only need to copy the code and post it on their blog site and ad content will be displayed relevant to the blog site niche.
Requirements for registering Google AdSense
Before you register for Google AdSense, there are a number of requirements that you must meet as follows, this list of AdSense is specifically for websites not YouTube:
- You must have a blog or website.
- You must be over 18 years of age, or if you are under 18 then you can use the data of your siblings or parents.
- You must have Google or Gmail email
Your question might be why Google AdSense requires you to be over 18 years old? This is because it will be related to payment and the validity of your data, you can be accounted for because it is at that age that you start to have an KTP or SIM.
How to Register for Google AdSense
There are three main points when registering for Google AdSense, namely:
- Sign up for AdSense
- Add the AdSense ad code to your blog
- Wait for your account to be reviewed and get word of acceptance or disapproval
The AdSense registration process is very easy, but the approval process can take a long time. This is done by Google on the grounds that it maintains the quality of Google AdSense itself and advertisers who have paid for the AdSense service.
In addition, Google also implements very strict requirements for bloggers and ensures whether the prospective sites that are registered are truly of high quality and meet the requirements to run AdSense. Point number 3 above is what makes many bloggers fail to receive their applications by Google AdSense.
Steps to Create an AdSense Account:
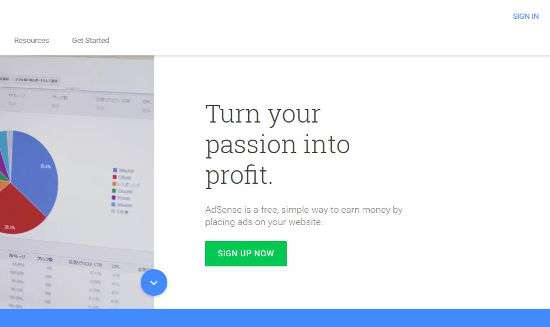
First, visit the Google AdSense site here to Register for Google AdSense → https://www.google.com/adsense/start/ .
After that, please click the “Sign Up” button to register for AdSense.
You will be required to create a new Google account or email (Gmail), or you can use an existing Google account if you have one.
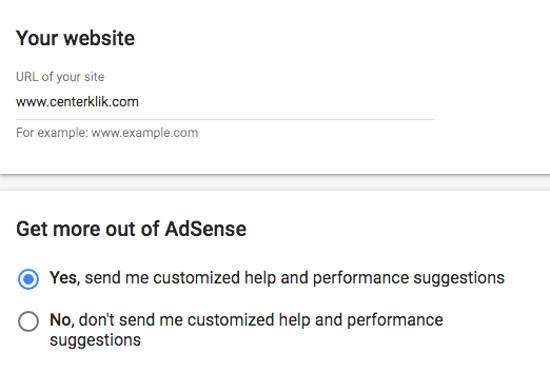
Next, you are required to create an AdSense account for your website by entering your site address. For the website URL use your blog address, and make sure to add it without “http: //”.
Furthermore, there is an option to activate advice information from AdSense “Get out more of AdSense”, usually this information contains suggestions from AdSense to optimize your ads so that you get good results and information will be sent via email or notification to your AdSense account.
If you agree then select “Yes, send me customized help and performance suggestions” or “No, don’t send me customized help and performance suggestions” if you don’t want them.
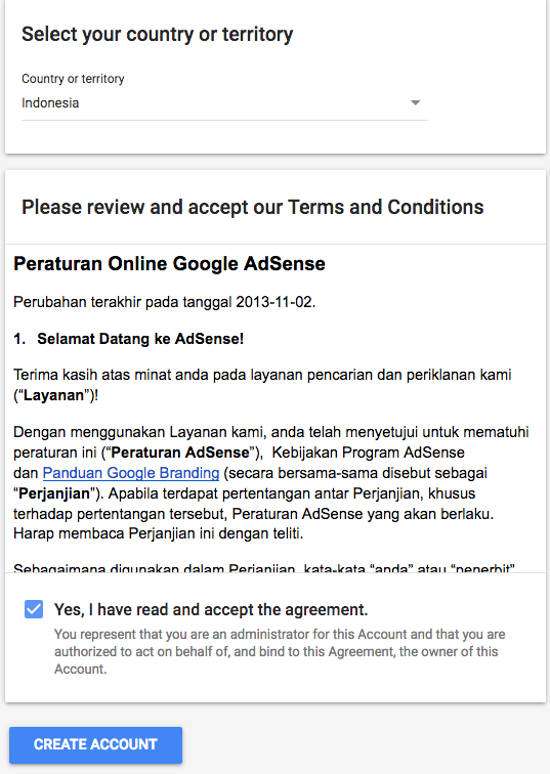
Next you are required to choose a country, fill in this section with the name of our country which is “Indonesia”. And don’t forget to tick the terms and guidelines for the AdSense agreement, then click the “Get Started” button.
After the above process, you will immediately be taken to the section of your AdSense account page and several popups will appear, just click the “Get Started” button.
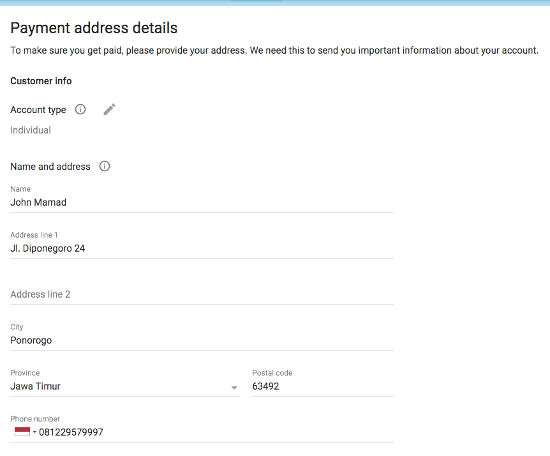
Next you will be taken to the steps to fill in information about the payment or “Payment Address Details”. In this section, try not to get it wrong and adjust it to your KTP or SIM. Because this will be related when withdrawing funds from AdSense.
Choose the Account Type with “Individual” if you are a regular blogger and “Business” if your site is a large business site such as the news portal Detik or Kaskus.
Next enter your name, full address, province, zip code and also your mobile number. And click “Submit”.
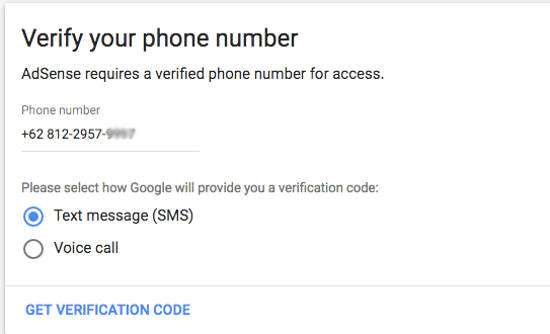
After that you are required to verify your cellphone number with the option of sending it via SMS or phone call. Please select: “Text Message” and click “Sent Verification Code”.
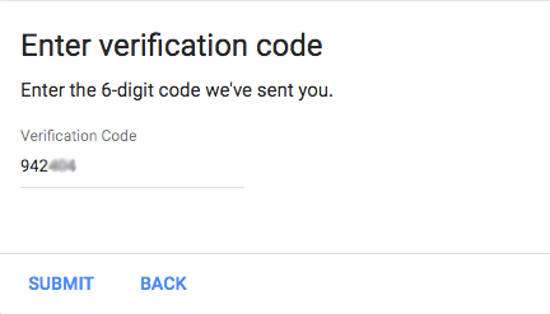
Please wait a few moments then Google will send an sms to your cellphone. And if you have got it, please enter the code in the verification code field. The total code is 6 digits. If you have, please click the “Submit” button.
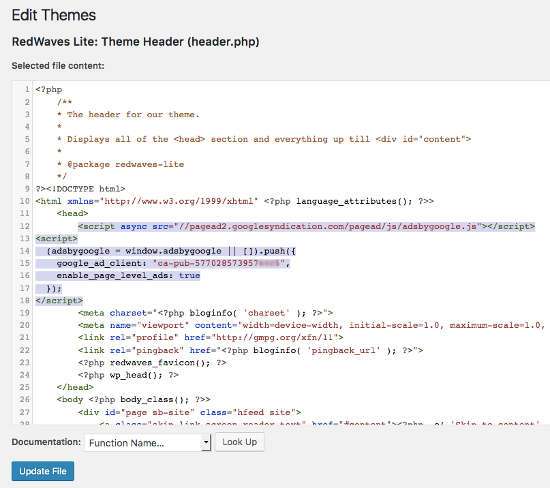
Furthermore, if the above process is successful. You will get the AdSense code, please copy it and paste it on your site right between the and tags. If you are a WordPress user then open the header.php file which is in the Appearance »Editor menu and look for the header.php file on the right side, if you have, please look for the tag and paste the AdSese code after the tag.
If you have pasted it in your header, please check the option “I’ve pasted the code into my site” and click the “Done” button.
If you have trouble following the instructions above to put the code, WordPress users are better off using a plugin called Insert Header and Footer .
And your AdSense registration process is now complete, then Google will review your blog site and this usually takes up to 3 days.

If you are accepted by Google AdSense then you will see AdSense ads appearing on your blog site and if not then you will receive an email notification from AdSense which contains the reasons why your site was rejected and gives some points what you need to fix.
And during the waiting period please pray a lot that Google AdSense accepts your application. 🙂
Google AdSense Pin
After registering for AdSense, and the ads on your blog have appeared, all you need to do is place AdSense ads again in the position you want. You can read some of the articles below regarding Google AdSense.
Read: How to Install Google AdSense on WordPress
If the ad has been installed, please continue blogging as before by creating quality and useful content while waiting for your AdSense income to reach $ 10, if it reaches $ 10 then AdSense will send an AdSense Pin to the address that matches your account.
AdSense Pins are useful for verifying your AdSense account so that it is completely Valid. Pin delivery will usually take about 1-2 months to arrive at your place, this depends on your geographic location.
If you have a Pin in your hand, then in order to get paid from AdSense, you need to complete two further steps:
- Submit your tax information
- Enter your PIN
You will need to submit specific tax forms for how you conduct business. For US-free activity certification, and for Indonesian AdSense publishers, you can fill in tax information like this:
- Login to your Google AdSense account.
- Select My Account and select Tax Information
- In the box on the right, under the words “Are you a US citizen, US resident alien, US corporation, or a US partnership?”, Select “No” and press the “Continue” button.
- Next you will get the question “Do you own equipment in the US related to your participation in AdSense?” and press “Continue” button.
- The final step, you will be prompted to enter your Full Name on the “Certification Of No US Activities” page. Make sure the name you enter matches the name used on your AdSense account. Click the “Submit” button.
Next, the thing you are most waiting for, of course, is the payment from the Google AdSense results that you run. You will start to be able to receive payments when your AdSense account is already earning the minimum $ 100, but you can also increase this threshold if you wish.
In the payment acceptance section, you can choose from several payment methods such as Western Union, Wire Transfer and Check. You can set this in your AdSense account in the Settings »Payments menu and select“ Manage Payment Methods ”.
I highly recommend if you are still earning a little under $ 500 then to withdraw your funds via Western Union because there is no discount at all. Unless your AdSense account is IDR or IDR then you can directly use Wire Transfer.
And that’s a complete guide on how to register for Google AdSense, hopefully this article is useful for you and congratulations on registering with AdSense, hopefully your blog is accepted and immediately makes money from Google’s advertising program. Good luck 🙂
