


In this article I will explain in details on how to setup WordPress settings on the “Settings” menu, but the discussion is specifically for WordPress users selft hosted or hosting itself is not for free WordPress on WordPress.com.
After you install WordPress the first time, by default WordPress will bring some settings that you need to configure correctly so that WordPress works optimally. The WordPress settings page is located on the “Settings” menu and by default there are 5 sub menus under the settings menu, and among them are:
- General
- Writing
- Reading
- Discussion
- Media
- Permalinks
Of the five menus above, I will discuss all of them in this article in full. And keep in mind that there will be an additional sub menu on the Settings menu if you install a new plugin, because most new plugins that you install on WordPress will place a new menu for plugin settings into a sub menu of the Settings menu. And here is a complete explanation of how to configure WordPress.
General Settings WordPress
The first way to configure WordPress is in General Settings, please enter the settings page for “General Settings” ( Settings »General ), the first thing you will see is” Site Title and Tagline “, where you have to see if this section matches the website. You. Because the title of this site will later appear in Google search results. By default WordPress will fill in the tagline section with the sentence “Just another WordPress site”, so you have to replace that section according to the tagline of your site so that what is displayed in search results and bars when opening your site matches the purpose of the site.
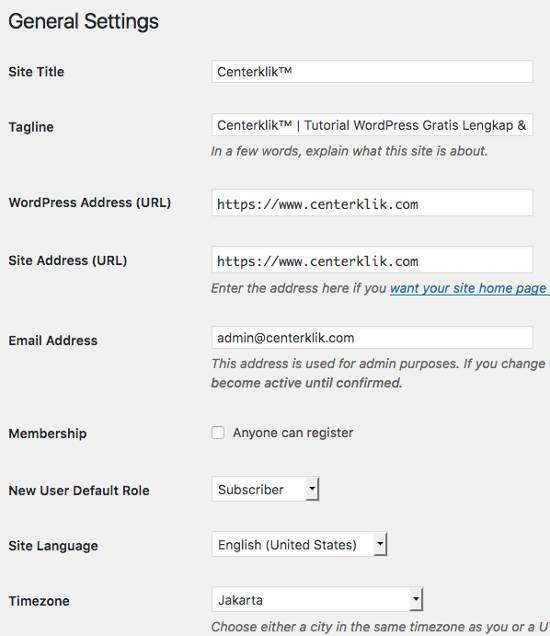
The next section is “WordPress Address (URL) and Site Address (URL)”, where specifically for the Site Address URL you can enter the URL address if you want the homepage of your homepage to be different from the directory where you installed WordPress. But I recommend leaving this section at the default.
Next, you will see the “Email Address” column, you can fill in this section with the email address that you will use for admin purposes for your site, because every notification will be sent to that email address, such as new user notifications, comments, WordPress updates. and much more.
Next up are the settings for “Membership”. This section is an option for you whether you want to allow visitors to register on your site or not. This membership is a great feature if you are running a membership site. The new user role is set as a subscriber by default.
Next is “Timezone”, in this section you can set the time according to the time zone you want or adjust to your city zone. Likewise with “Date Format” and “Time Format”, you can choose according to your wishes, but remember that this date format will be visible on every blog post.
WordPress Writing Settings
The next way to configure WordPress is in the “Writing Settings” ( Settings »Writing ) section, all the settings on this page are related to writing and publishing content for your WordPress site.
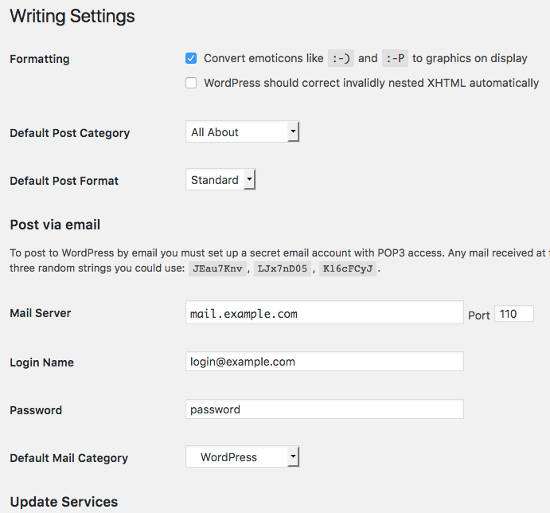
The “Formatting” section has two options where you can determine whether WordPress will automatically convert certain symbols into emoticons and the second option is to activate WordPress so that it will automatically fix invalid nested XHTML. By default the first option is activated.
Next is “Default Post Category and Post Formating” where in this section you can determine which default category you will use, the meaning is if you write content later but forget to select a category, then the default category will be automatically selected. As for the Default Post Formatting, you leave it in the Standard position, you can choose it later when publishing content if it really needs to be adjusted to your content.
Furthermore, “Post via email”, this section allows you to post via email. To use this, you must set up a secret e-mail account with POP3 access, and all e-mail received at this address will be posted. For this reason, it is a good idea to keep this address secret.
The last part “Update Services”, When you publish a new post, WordPress will automatically notify the update services listed here or the term is ping services. For more information, see the Update Services link in this section.
Reading Settings WordPress
This section of the settings page for “Reading Settings” ( Settings »Reading ) contains settings related to the display of your content.
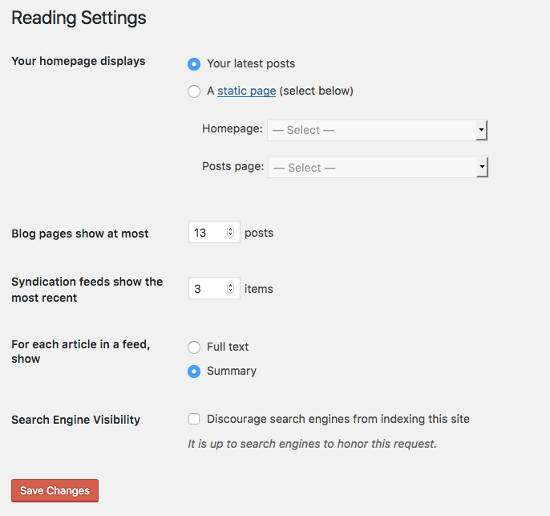
In “Your homepage display” there are two options where if you select “Your latest posts” then what is displayed on your front page is a list of your last posts and this is dynamic (usually for blog site options).
Whereas the second one is “Static Page”, this option is to display a static or permanent front page taken from a page or pages. You must create a page first if you choose this section (commonly used by e-commerce sites, business, portfolio or others).
Next is where you can control the appearance of your content in the RSS feed and also include to control the maximum number of posts to be displayed on the front page and also to display the content in full text or summary.
The last part which is “Search Engine Visibility” is an option if you want search engines to ignore your site or you don’t want search engines to index your site. This option is necessary if you are currently developing your site and you are not ready for it to be indexed by search engines.
Discussion Settings WordPress
On the “Discussion Settings WordPress” page ( Settings »Discussion ) there are many options for managing comments and controlling links to your posts or pages.
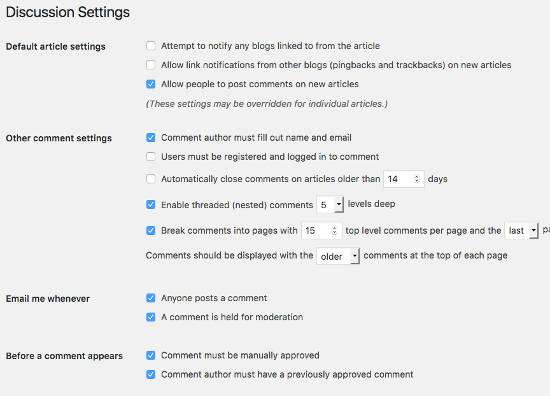
The first section is for the default article settings. The first setting relates to the links you make to other blogs. The second deals with ping backs and trackbacks, or links back to your blog. The third setting in the default article setting allows people to post comments on new articles. If you prefer not to allow people to comment on your posts, uncheck this box.
In other comment settings, you can select a guide for how people post comments and how their comments are handled.
Furthermore, in email me whenever, you can choose to send an email notification when a visitor leaves a comment or if a comment requires moderation.
Before a comment comes a section discussing how comments are published. Here you can choose whether the administrator should always approve comments or direct comments to be published automatically.
In the Comment Moderation area, you can adjust how comments are held based on the number of links. In this box, you can also add a word, name, URL, email or even IP to filter comments to the moderation queue.
In the Comment Blacklist section, you can create a blacklist for comments that are indicated as spam.
Next, look at the avatar section. An avatar is a profile picture that you can assign to your e-mail address when commenting on sites that activate avatars. Here you can enable avatar display for people who comment on your site, filter by their rating or choose a default avatar for people who don’t have their own avatar yet.
If you don’t have an avatar, visit the gravatar.com site to upload an image to make your own avatar.
WordPress Media Settings
In the section “Media Settings WordPress” ( Settings »Media ), you can set the maximum size for images included in a post. This setting is great for saving time if you always want your images to be the same size or if you want to apply the default settings for medium and large image sizes.
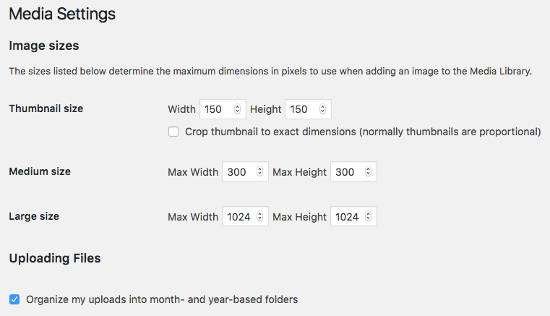
The File upload option lets you choose whether your uploads are organized into folders with month and year based naming. This is to make it easier for you in file management in WordPress.
Permalinks Settings WordPress
Permalinks are permanent URLs to individual pages and blog posts, as well as category and tag archives. Basically, permalinks are web addresses that are used to link to your content which is permanent, and never changes – which is why they are called permalinks.
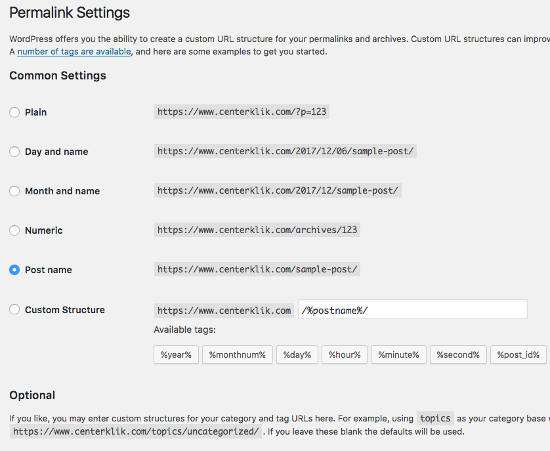
In the WordPress Settings configuration section in “Permalink Settings WordPress” ( Settings »Permalinks ), try to correctly select the correct settings. Because this will greatly affect SEO , where WordPress by default chooses the permalinks format which is not good because it is difficult to read by users and search engines, and my advice is to choose “Post Name” if you are a blogger who posts less frequently, but If your site is a news site it is highly recommended to select the “Day and Name” permalinks format. Or you can adjust it yourself by selecting “Customize”.
And finally for the WordPress configuration is in the “Optional” section where in this section you can change the URL for a category or tag. By default the WordPress category URL is “Category” and you can change it to “Topick” or whatever you want.
Those are some explanations about how to configure WordPress on the WordPress Settings page, I hope this article is useful for you and helps you make it easier for you to setup WordPress optimally. Good luck 🙂

