How to Install Google Maps on WordPress . WordPress is a blogging platform that supports various file types and supports multiple embeds. You can add any type of content to your WordPress site, you can add files of audio, video, PDF and Spreadsheets types in WordPress.
In addition to files, you can also use the embed feature to post twitter, facebook, instagram and Google Maps status. If you have visited a company website or someone else’s personal website, you may have seen in the contact section there is also a map, the map that is posted is taken from Google Maps. Read ⇒ How to Add Address and Place Location to Google Maps .
If you also want to post a map of your address location, then in this article I will show you how to add Google Maps to your WordPress website. In this article, I will provide two ways at once, namely manually and also using plugins.
Adding Google Map in WordPress Manually
To do this, please first visit the Google Maps website, and simply type the location address in the search field located on the top left with the address you want to display or search for the location.
Once you have found the location, click the three-line icon Ξ Menu button next to the search field and select Share and embed Map. This will display the embed code. Copy the iframe code or you can also click ” Custom Size ” to adjust the map display size according to the size of your site.
If you have, please paste the embed code in the post, page, widget or template. And after that don’t forget to save the post or page and see the Google map already installed on your WordPress site.
Make Map Appear Responsive
If you want to make Google Maps appear responsive or can adjust to various screen sizes you can do custom CSS, with this you will provide a better user experience.
And even though the Google Maps Embed Code settings already have width and height settings on the iframe, you must still use this method to appear responsive. Now please add this CSS property to your style.css file in your theme or in the child theme.
[CSS] .responsive-map {
overflow: hidden;
padding-bottom: 56.25%;
position: relative;
height: 0;
}
.responsive-map iframe {
left: 0;
top: 0;
height: 100%;
width: 100%;
position: absolute;
} [/ CSS]
And after you add the above code to the CSS, then add a class tag to the google map iframe embed code in your post so that it looks like this:
Adding Google Maps in WordPress With Plugins
The first method is a great method of choice, if you only want to embed or embed a Google Map for only one location on your WordPress site. But if maps play an important role in the main content of your site and you need to add maps to your posts frequently, then we recommend using the Google Maps MapPress Easy plugin.
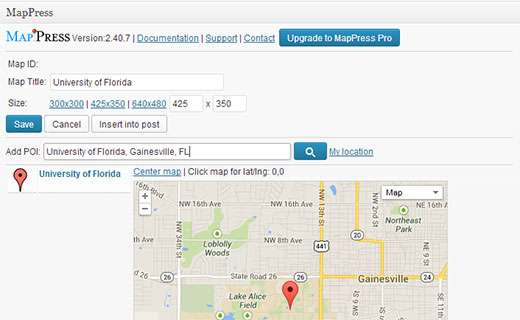
The first thing you need to do is install and activate the MapPress Easy Google Maps Plugin . Edit the post / page where you want to add the map. Scroll down to the MapPress section of your post screen and make an edit and click on the New Map button.
This will open the MapPress editor where you can enter the address or click Link location. then the plugin will automatically detect the location you typed. If you have found it, please provide a title for the map and select the map size according to your wishes. Once you are done making settings, click on the “Save” button and then click the “Insert into post” button to add the map to your post. After that click Update or Publish on your post and see the results.
With the MapPress plugin you can add multiple maps to a post or page. MapPress also adds a plugin settings menu to your WordPress admin sidebar. You can make google map display settings by clicking the Settings plugin and in the settings section you can adjust the map type, border, alignment, control, etc.
Added Google Maps in Widget and Lightbox
Another easier way to add Google Maps to your WordPress site is by installing the Google Maps Widget Plugin . After activating the plugin, please go to the Appearance »Widgets menu and drag and drop the Google Maps Widget to the sidebar area you want.
Enter the Map address in Widget settings. You can also choose the map size, pin color, zoom level, etc. Click on the lightbox tab to configure the lightbox settings. Finally click the Save button to store your widget settings. And now see the results.
The above is how to install Google Maps on WordPress in two ways, either manually or with a plugin. Hopefully this article is useful for you and good luck. 🙂


