


Looking for a guide on how to install WordPress on Aruba? You are in the right place! In this article we will see how to perform this very simple operation.
WordPress is the most popular CMS (Content Management System) in the world. If you need a complete guide to building your website, take a look here. Do you need a professional? I am at your disposal to carry out any type of project!
If you have not yet chosen your Aruba hosting plan and you want to save time, Aruba offers you two packages dedicated to WordPress : skip to point 3 of this article to find out more. If you want a more performing and faster hosting, I suggest you take a look at Siteground .
In the following article I will show you the procedure to install WordPress on Aruba using the application inserted in the control panel. For manual installation, I refer you to this detailed guide .
Ready? Let’s begin!
What do you need to install WordPress on your Aruba hosting plan?
Aruba offers many hosting plans: shared, virtual private server (VPS), dedicated and cloud hosting. Any of these options are fine, as long as the hosting has a Linux operating system and offers one or more databases. To stay with the basic option, shared hosting, if you bought one of Easy, Advanced or Professional , you will have no problems.
If you have chosen the Basic package, you will need to verify that you have also purchased a database (in this package it is optional), otherwise you will have to add the service. How? By logging into your customer area, clicking on Control Panel> Database> MySql> Buy.
If you have any doubts, the advice is to contact Aruba customer support!
How to install WordPress on Aruba: the step-by-step guide
The procedure is simple:
- Log in to the customer area with your credentials;
- In correspondence with the chosen domain, click on “Control Panel”;
- In the “Linux Hosting” section, look for the “Softaculous App Installer” app;
- Click on WordPress> Install;
The installation screen will open (found below), in which you will have to:
- Choose the version of WordPress you want to install (at the time of writing this article is 5.2.2);
- Select the installation url , i.e. the protocol (http or https), the domain (eg wpradar.com/test2) and the folder in which to install WordPress. If you want to install the application in a specific directory, enter only the directory name, without / (eg “dir”). To install WordPress in the root (the main folder), leave blank;
- Enter the database information , that is: database name , database username, MySQL user password and MySQL host name . All this information is provided to you when purchasing the hosting plan or the MySql service. To retrieve them, follow the procedure described here: https://managehosting.aruba.it/Domini/spediscidatidominio.asp ;
- Define the data of your site , i.e. name and description (these are fields that you can change at any time from the site control panel);
- Set access , through a username and password, and the site administrator’s email;
- Select the language ;
- Choose from some installable plugins : Limit Login Attempts (Loginizer), Classic Editor and wpCentral – Manage Multiple WordPress;
- Choose from a few themes , but I recommend that you only ever work with premium themes;
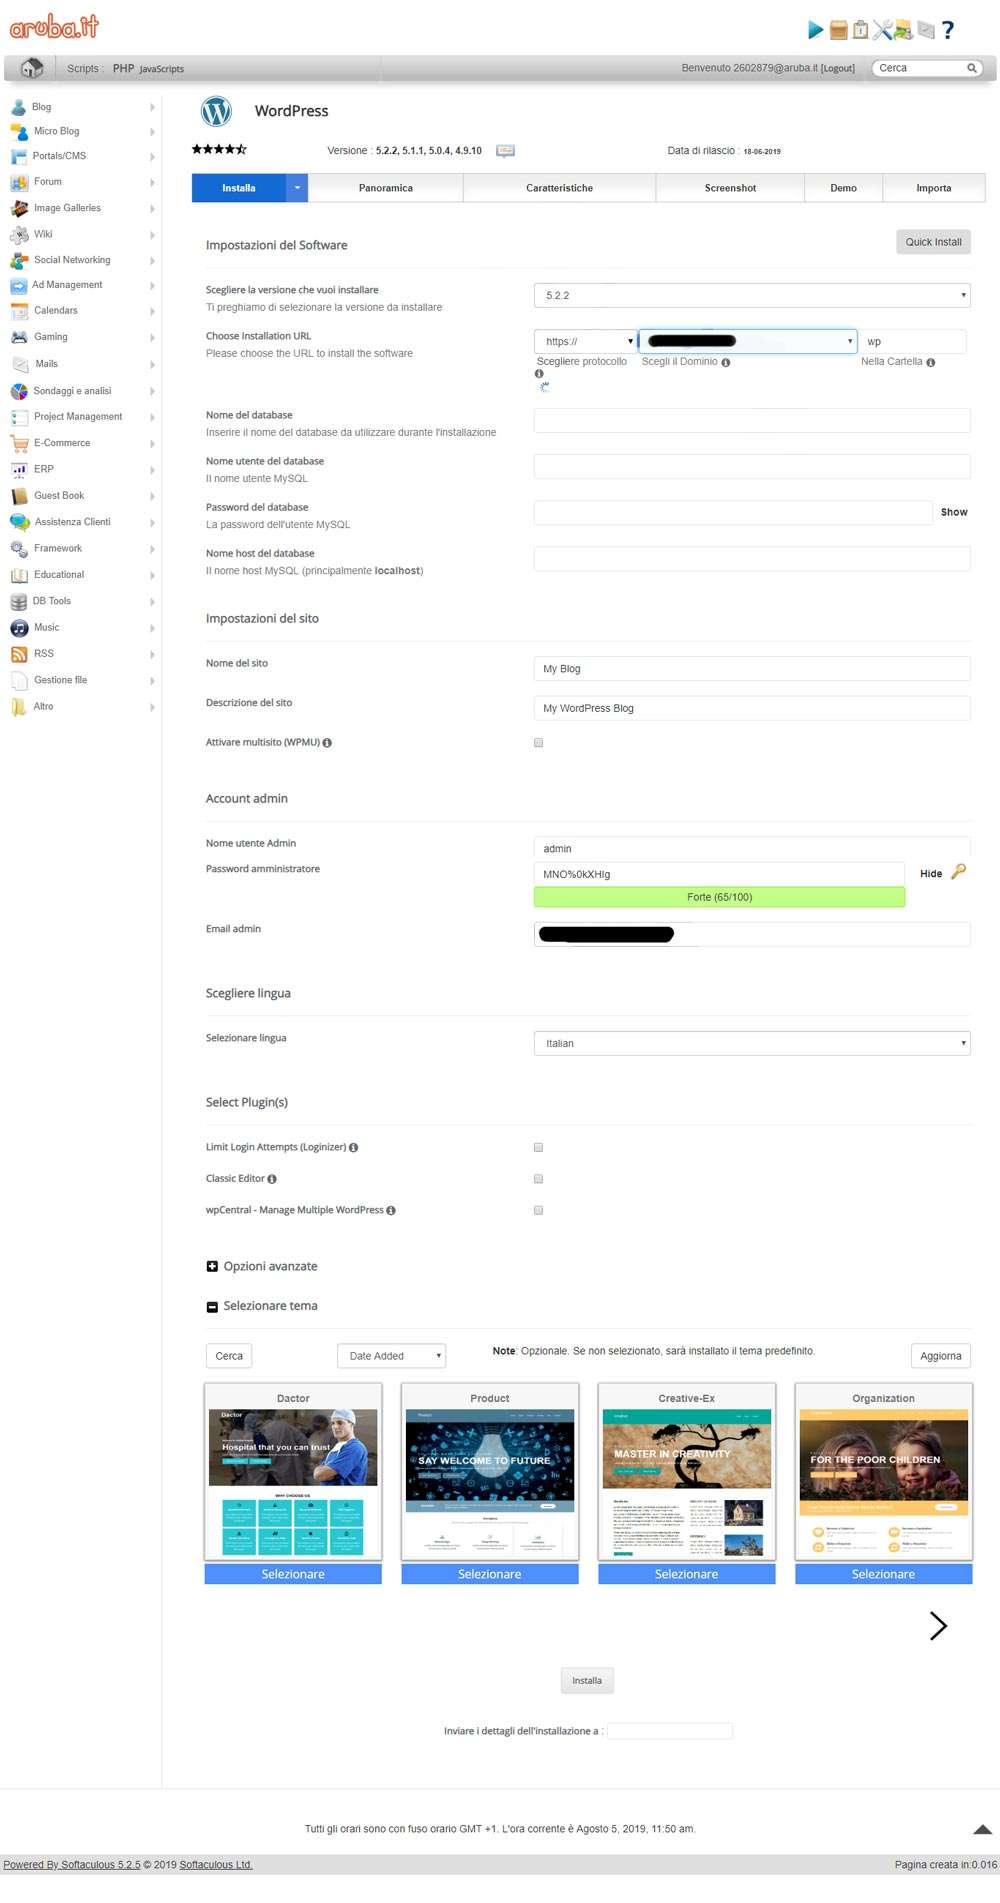
Fill in all the fields, you just have to click on install et voilà, you will have installed WordPress on Aruba!
Aruba packages for WordPress
Aruba offers two WordPress specific packages choosing which you will not have to install WordPress because it will be provided by default. The two floors are:
- WordPress hosting : 24.99 euros + VAT per year;
- Managed WordPress Hosting : 79 euros + VAT per year;
The difference is that the second package also includes: automatic updates, optimized platform and dedicated resources, advanced support (optional), staging environment, backup on demand and one-click restore.
Well, we’re saying goodbye. I hope I have provided you with useful information: if so, leave a vote at the bottom of the page!

