


How to Install a Free SSL Certificate on WordPress using Let’s Encrypt – Installing an SSL Certificate on a website has proven to be effective in minimizing the occurrence of hacker attacks who want to steal data because by installing this SSL Certificate your website becomes more secure and any information sent via the browser to the server has been stored. encryption so that information is not easy to read.
There are many ways to improve website security and this is important to do so that your website can avoid irresponsible attacks that will harm you. Especially if your website functions as a tool for running a business related to clients, be it eCommerce, online payments for goods and services or other types of online businesses.
In this article, I will try to discuss how to install a free SSL Certificate on WordPress using Let’s Encrypt to make your WordPress website more secure and without spending the cost of buying an SSL license. Before getting into the discussion of Let’s Encrypt’s free SSL certificates, I will give you a few tips on how to secure your WordPress website and the difference between HTTP and HTTPS.
WordPress Security
WordPress is always updated and developed by experienced developers around the world on a regular basis to ensure that the platform remains secure and does not lag behind, but even if it has been done by WordPress developers, you as a user also need to make an effort to ensure your site remains safe. All of this is done because the internet continues to develop, and hackers are still finding new ways to hack websites, especially since WordPress is a popular platform and many users have made this the main target platform for hackers to always look for loopholes from WordPress weaknesses.
The first step to basic security that you should implement in WordPress is to always change your WordPress username and password regularly with strong passwords.
The second step is that you must always keep your WordPress core updated when WordPress gets updated and keep up to date with the plugins and themes you use.
The third step is that you always have to do regular backups when you want to make changes or make updates. Even if there are no updates being performed, the backup process should be performed on a scheduled basis to avoid future problems.
The fourth step is that you have to make changes to the default WordPress login URL to a unique URL, this needs to be done because the default WordPress URL is known to all WordPress users and hackers, because this gap is commonly used by hackers to launch brute force actions.
Apart from taking the basic steps listed above, you will need to enable encrypted communication between the site and your browser. Every time a user accesses your website, the server and browser exchange necessary information with one another.
You don’t want outsiders to have access to these communications, but they must remain encrypted and used only by web browsers and servers. For that, you have to make your site secure by installing an SSL Certificate.
Difference between HTTP and HTTPS
HTTP stands for ‘Hyper Text Transfer Protocol’, and HTTPS stands for ‘Hyper Text Transfer Protocol Secure.’ HyperText is enriched Text, text that contains links, formatting, and other elements. HyperText transfer over multiple channels across a network requires a specific set of rules or protocols.
HTTP defines the rules for data transfer between the browser and server. When the security protocol is implemented over HTTP, it becomes HTTPS.
Best Indonesian bank websites, e-Commerce websites, Payment Gateways and many other sites that need to handle sensitive information must use HTTPS for encryption. HTTPS is necessary to safeguard the interests of customers and businesses. And HTTP on the other hand is used for data transmission between the browser and the server without encryption.
To get an HTTPS Domain name, you need an SSL certificate from a CA (Certificate Authority). You can use Let’s Encrypt to get an SSL certificate and keep your website secure for free.
What is Let’s Encrypt?
Let’s Encrypt is a CA (Certificate Authority) that provides free SSL certificates for TLS encryption via an automated procedure. Many companies such as Google, Facebook, Cisco, Automattic, Mozilla have come together to support Let’s Encrypt to increase the overall level of security on the Internet. ISRG (Internet Security Research Group) defends it. The Automatic Certificate Management Environment (ACME) allows you to install certificates with just a few commands.
How to Install a Free Let’s Encrypt SSL Certificate on WordPress
Let’s Encrypt provides a free SSL certificate that you can use for WordPress sites. And this is important for you to use while it is free, besides your website is safer you will get benefits such as your visitors or customers will feel more confident in the security of your site and will also have a positive impact on your search engine rankings.
Let’s Encrypt is also easy to integrate, especially if you use hosting services like Bluehost , Hostgator , Siteground which let you create SSL certificates with Let’s Encrypt in their cPanel.
The steps to create a free SSL certificate using Let’s Encrypt on a hosting that supports Let’s Encrypt.
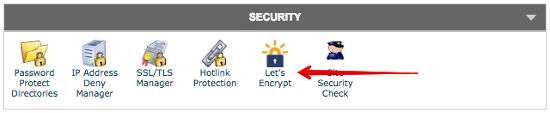
Step 1 . Login to your website cPanel.

Step 2 . Go to the “Security” section and click the “Let’s Encrypt” icon.
Step 3 . Select your Domain Name and fill in other options such as an email address when asked.
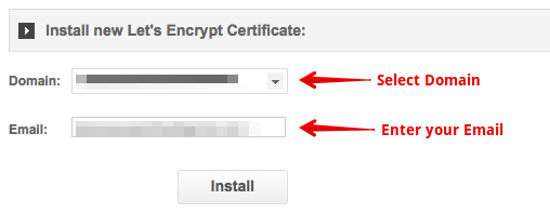
Step 4 . Click the Install or Add Now option.
Step 5. Save the certificate that you have created. Because you will need it later.
If your web host doesn’t offer the Let’s Encrypt option on cPanel, you can contact Let’s Encrypt directly, and they’ll guide you through the process. Of course this method will be more complicated than the steps above and can vary greatly between different hosting services.
Configure the Website to make the SSL certificate work
After creating an SSL certificate for your domain, you will need to configure your website and load the certificate for it to work.
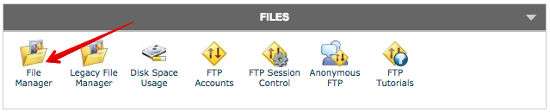
Step 1 . Open cPanel from your website.
Step 2 . Open File Manager or FTP.
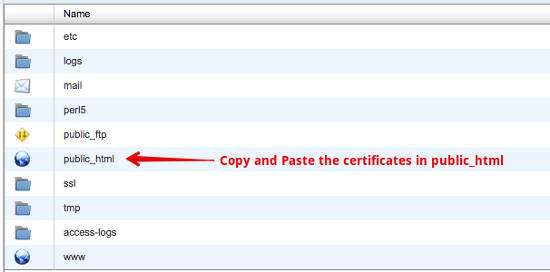
Step 3 . Copy and Paste the certificate file in the public_html folder on your website.
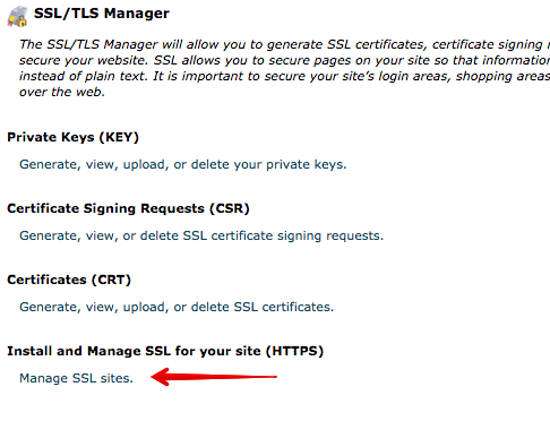
Step 4 . Close FTP and go back to the cPanel Dashboard and go back to the “Security” section and click the “SSL / TLS Manager” icon.
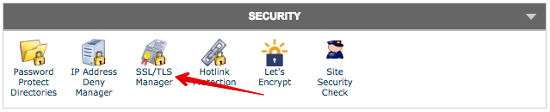
Step 5 . Click ‘Install and Manage SSL for your site (HTTPS)’.
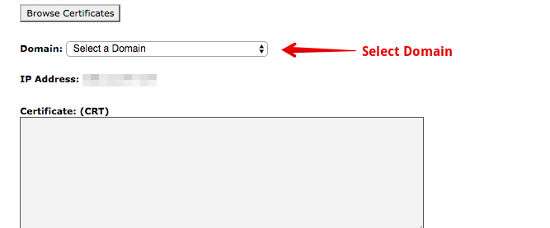
Step 6 . Copy the code from cert.pem, private.pem, and chain.pem.
Step 7 . And paste the code into the respective boxes provided.
After the above process is complete, please save and your SSL encryption certificate should be active on your site. This process usually takes about ten to fifteen minutes.
Update the WordPress URL to HTTPS
After securing your website with an SSL certificate, you need to change your URL from HTTP URL to HTTPS URL from your WordPress Dashboard. Without changing the URL, the SSL certificate won’t work, and your website won’t be completely secure.
Step 1 . Go to your WordPress website Dashboard.
Step 2 . Hover over ‘Settings’ and click ‘General’.
Step 3 . Change your WordPress Address and Site Address from HTTP to HTTPS.
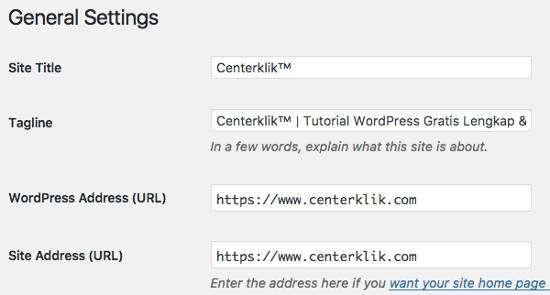
Step 4 . Click the ‘Save Changes’ button.
After completing the steps above, your website is now an HTTPS website with an SSL certificate installed on it.
If you have a new website then the process is complete, but if you already have a website that has a lot of indexed pages on Google then it will cause some problems.
Some of the pages of your site will load using the HTTP protocol, and others will load with HTTPS.
This can be very counterproductive to your search engine ranking. Also, many backlinks that use HTTP will no longer work.
But you don’t need to worry because there are several plugins like ‘ Really Simple SSL ‘ that you can install, this plugin detects the SSL country on your site and configures it to run over HTTPS. All HTTP references will automatically convert to HTTPS, and you won’t lose any traffic.
Read: Secure the Nginx Server with Let’s Encrypt on Ubuntu 18.04
Google Analytics configuration
If you are using Google Analytics as a traffic analysis on your website, then you also need to do this step to let you know that your site is now using HTTPS URLs in Google Analytics. And here’s how to Update Analytics Settings for HTTPS.
Step 1. Login to your Analytics Account.
Step 2. Enter the Admin menu.
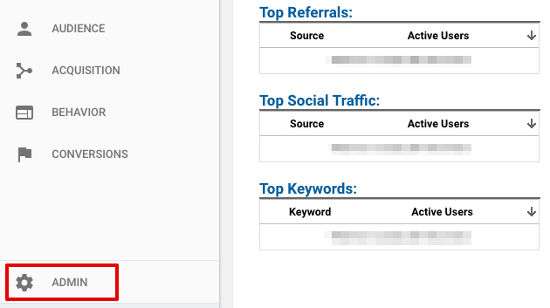
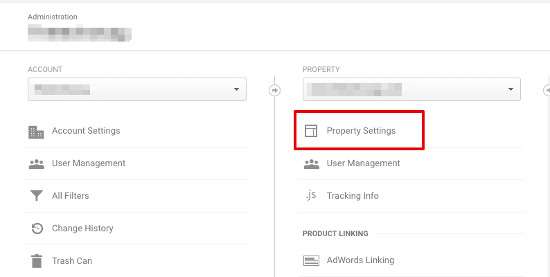
Step 3. Open your website settings by clicking “Property Settings” under your domain name.
Step 4. Click Default URL and Select HTTPS from the drop down menu.

Step 5. Click the “Save” button.
Now, Google analytics will give correct report about your traffic analysis after changing using HTTPS SSL Certificate.
Read: 10 Best and Most Trusted SSL Certificate Services for Website Security
And those are the steps in installing a free SSL Certificate on WordPress with Let’s Encrypt, I hope this article is useful and makes your website more secure. Good luck 🙂

