


Yoast SEO is one of the most important plugins for WordPress , definitely the number 1 when it comes to improving search engine rankings .
In this guide, updated to the latest software developments (2019), we will see how to install, configure and make the most of the power of Yoast SEO.
There is a lot you can do to boost your ranking, so get down with the work!
Premise: what is SEO (and why you need to know before installing Yoast SEO for WordPress)
Yoast SEO for WordPress is a plugin that takes care of some of the fundamental aspects of SEO. This acronym stands for Search Engine Optimization , search engine optimization. If you don’t know what it is, you should take a few minutes to read my free guide to search engine positioning . You will get a complete overview of the requirements and techniques to be used to climb the ranking.
SEO is a complex matter, there are many aspects to consider. Properly installing and configuring Yoast SEO for WordPress is not enough to guarantee you the desired results . Therefore, arm yourself with patience and analyze in detail every aspect related to your site: only in this way will Yoast SEO be a valuable help.
All clear? Let’s proceed with our guide!
Before Installation: Check your WordPress requirements and settings
WordPress is a rather well optimized CMS (content management system). A basic setup, with essential plugins and a few small tweaks, can be enough for many projects. But if it comes to improving your positioning, then the matter becomes a little more complex.
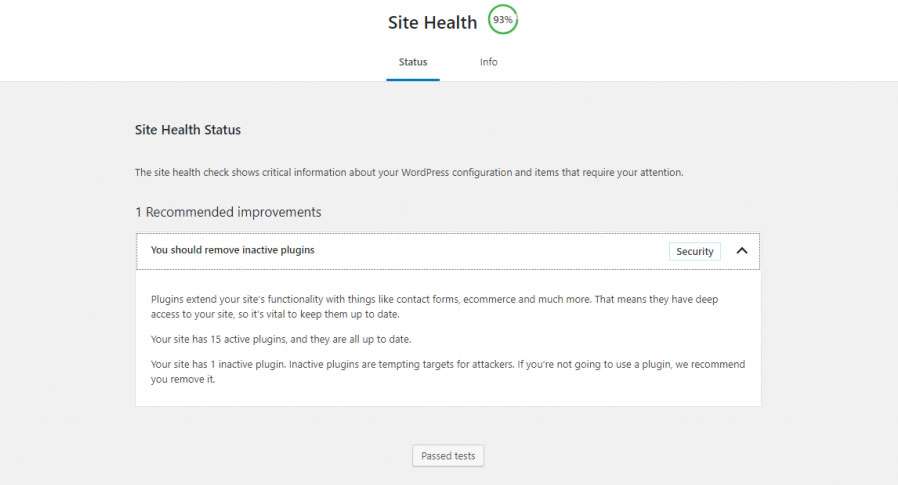
Check the requirements with Site Health
Before installing Yoast SEO, it is advisable to check the health of the site . In particular, you need to make sure you use a performing hosting plan (personally, for small and medium-sized sites, I recommend Siteground, the best WordPress hosting ), that the active PHP version is among the most recent. And again, monitor the disk space occupied, the database, the installed plugins etc.
To get an idea of what’s going on behind the scenes on your site, go to Tools> Site Health . Here you will find loads of technical information and tips to help you improve the basic performance and security of your site.
In older versions of WordPress, Site Health is not available by default, it must be installed as a simple plugin. One more reason to be always up to date!
Make sure you are using a modern hosting plan
According to the WordPress technical requirements page, a suitable hosting plan should include a modern version of PHP, MySQL, and HTTPS support . It is possible to work on older servers, but it is not recommended. With Health Check you can view the technical details of your installation. Also, if you open your hosting provider’s dashboard you should be able to see the features of the activated plan.
Make sure you have PHP 7.0 or higher
Many WordPress sites still run on outdated versions of PHP. About half of the active sites are using a PHP version of the 5 series, even though PHP 7.0 and later versions have been available for more than three years!
The problem is that older versions of PHP no longer receive security updates and are therefore increasingly vulnerable to attack . For this reason, from December 2019 the minimum version supported by WordPress will be 7.0.
So, one of the most important things you can do to improve your site’s performance and security is to upgrade your hosting environment to a modern version of PHP . What benefits can you get? Speed, efficiency, the ability to use a series of modern features.
Check with Site Health the version of PHP installed and, if necessary, access the control panel of your hosting provider to increase it. If you are inexperienced, ask your provider’s technical support. Above all, before performing this or other update operations, make a backup of your site and database : caution is never too much!
Make sure you have an SSL security certificate installed
Without going too far into the technical, the SSL certificate is a protocol that allows you to activate browsing in secure mode ( HTTPS , the famous “green lock”). At one time this choice was optional and reserved only for e-commerce, for the security of transactions. Today it is, in fact, mandatory : search engines could penalize sites without valid SSL certificates and settings (and / or show warnings next to search results).
The SSL protocol also improves the security of your site, preventing hackers and third-party software from intercepting requests and data. Not only that: activating browsing in safe mode increases site performance . To take advantage of new, faster web technologies like HTTP / 2, browsers such as Google Chrome and Firefox require the website to have a valid SSL certificate.
To activate the SSL certificate and browse your site on HTTPS you must first make sure that your hosting plan includes it, then access the hosting dashboard and install it using the appropriate app. If you are not able, you can ask for help from technical assistance. Once this is done, a plugin like Simple SSL, very simple and powerful, can be useful to move your entire site to HTTPS.
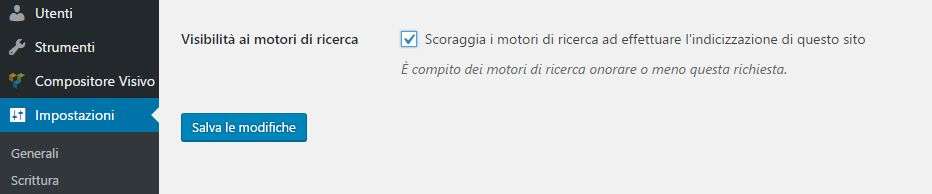
Check the “Settings” section
It’s worth spending a little while examining your control panel’s “Settings” menu , as many of the available options can affect WordPress SEO.
In particular, you must make sure that in Settings> Reading the box “Discourage search engines from indexing this site” is not checked . This, in fact, would prevent the site from being indexed, damaging your visibility.
Also make sure that the write and read settings are correct, such as the home and article page selection, the default category for posts, the text editor selected (classic or Gutemberg).
Also, don’t forget the site title and the “motto” in Settings> General : they can be very useful!
Check the permalink structure
The permalink settings define the URL structure , which, as you will know if you have read my guide to positioning on search engines , is very important to improve the ranking. So, if you are creating a new site, one of the first things to do is change the permalink settings in Settings> Permalinks .
The default WordPress setting is for URLs that look like this:
domainname.it/?p=123
Technically it is correct, but scarcely “communicative”: the ideal is to have talking addresses , that is URLs that contain keywords or, in general, explain the content of the page at first sight. Just to stay on the subject:
marcoloprete.it/test2/yoast-seo-wordpress-guida-completa/
Warning: it is important to select the correct structure in the initial stages of site processing , as modifying it later can cause SEO problems (404 errors to be corrected later with redirects).
Usually, unless you have special needs, the recommended structure is this:
example.it/categoria/titolo-post
To get it, select “Custom Structure” and insert, after your domain, the /% category% and% postname% tags.

Yoast SEO for WordPress: general installation and configuration
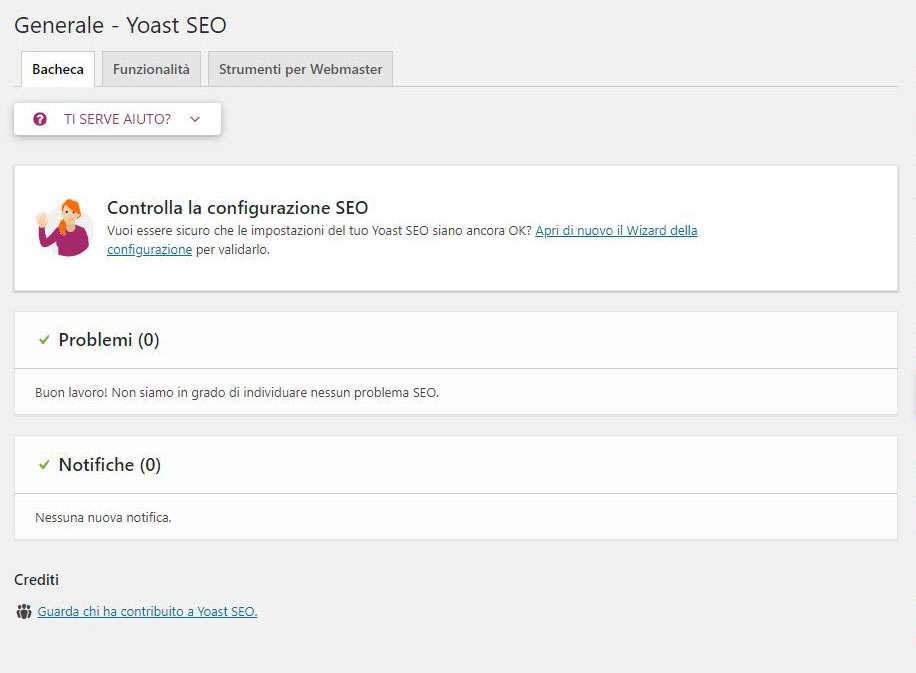
You can install Yoast from the Plugins> Add New section, by doing the internal search or by uploading the previously downloaded file. The general configuration is accessed via the SEO> General menu . Inside are three options: Dashboard , Features and Webmaster Tools . Let’s analyze them together!
The bulletin board
Within this section you will find a summary of the problems reported by Yoast or notifications . Pay particular attention to the first one: it can be very useful.
On this page you also have the option to activate the installation wizard. Since that type of installation is sufficiently explained by the plugin itself, step by step, I will not examine it, in favor of the “manual” configuration.
The functionalities
This section offers you the possibility to activate or not some Yoast SEO features. Let’s see them:
- SEO analysis : offers suggestions to improve the SEO strategy of your text;
- Readability analysis : offers suggestions for improving the structure and style of the text;
- Cornerstone content ; allows you to flag and filter cornerstone content (the best and most important articles and pages) on your website;
- In-text link counter : helps you improve the structure of your site;
- XML Sitemaps : Enable the XML sitemaps generated by Yoast SEO;
- Ryte integration : the integration with Ryte checks daily that your site is indexable by search engines and notifies you when this does not happen;
- Admin Bar Menu : Yoast SEO’s Admin Bar contains useful links to third-party tools to analyze pages and make it easy to check for new notifications;
- Security : No advanced author settings: The advanced section of the Yoast SEO meta box allows a user to remove articles from search results or change the canonical. These are things you may want to prevent an author from. That’s why, by default, only editors and administrators can do this. Setting to “Off” allows all users to change these settings:
Personally, the only function I have activated on my site is that of the sitemap . The rest is disabled, because, for example, for the readability of the contents, the internal links and, more generally, for the SEO strategy, I prefer to rely on Semrush , a powerful and professional SEO analysis and web marketing tool. The last option is disabled because no one else other than me has access to the site.
Regarding the sitemap, it is worth spending a few words. It can be reached at domainname.it/sitemap_index.xml . This is the index of active sitemaps , because Yoast SEO creates maps for each type of content. This is a very useful feature, because it allows you to exclude some taxonomies or some types of content from the map and prevent them from being indexed . We will see how later!
Webmaster tools
You can use the boxes in this section to link a series of tools typically useful to webmasters, such as the Google Search Console , and get more information for analysis. By following the links for the different tools it is possible to obtain the instructions for the verification methods and obtain the code.
Configure the Search Appearance
In this section you will find some basic options, present in the tabs “General”, “Types of content”, “Media”, “Taxonomies”, “Archives”, “Breadcrumb”, “RSS”. Here they are in detail!
The “General” section and Schema.org
The first active tab is “General”. Within this screen you can select the separator , which, for example, will appear between the title of your article and the name of the site. Symbols are displayed in the size they will appear in search results.
Scrolling to get to “Homepage & first page” , but here Yoast warns us that it is possible to set the title and description (title and meta description: if you don’t know what they are, run to read my SEO guide! ) Of the home page by modifying it directly through the meta box that you find inside (we will explain it later).
Finally, there is the section dedicated to Knowledge Graph and Schema.org . For more technical information, read my guide to positioning on search engines . Here we can say that this information is metadata that appears in the Google Knowledge Graph. Personally I don’t use Yoast to define these aspects, I use a plugin with more features like WP SEO Schema (in premium version). However, if you have no special needs you can very well start from here!
Content Types, Taxonomies and Archives
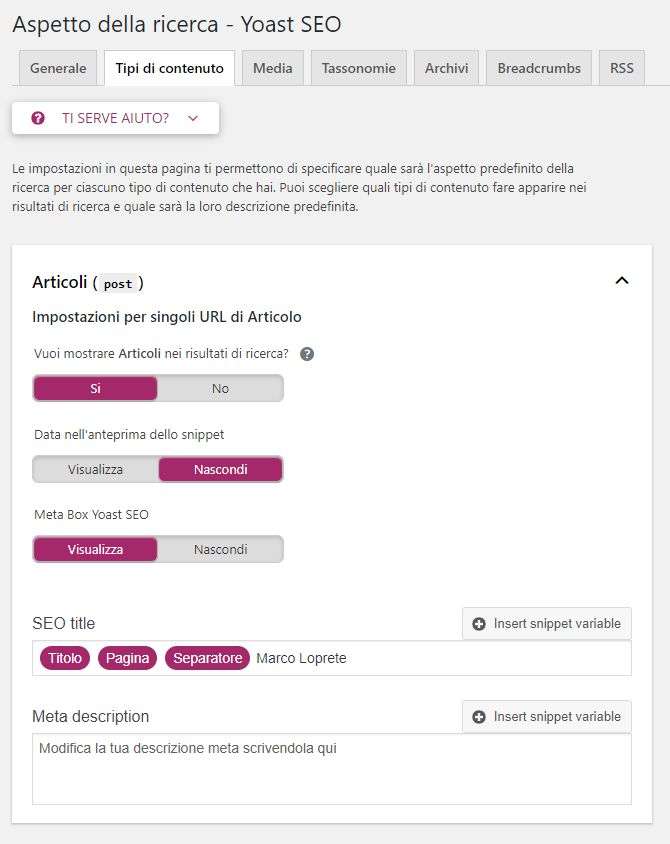
These sections deal with different issues but have a similar logic. The idea is that you can decide what to index and what not , whether to activate the Yoast meta box in the respective sections of the control panel (the Yoast configuration management panel that appears below the text editor on all pages, posts, categories and tags) and how to automatically structure titles and descriptions .
Let’s start with “Content Types” . Here, for example, you can decide whether to show pages and articles and any other type of content on search engines that includes the theme or plugins you have installed. Don’t want the articles to be visible? Click on “No” and they will not be shown (thanks to the automatic insertion of the “noindex” tag and the lack of insertion in the sitemap).
Do you want the creation date of the page or article not to appear in the Google snippet? Click on “Hide” next to “Date in the snippet preview”.
You can also set the titles and meta-descriptions of this kind of content using variables. For example, you can structure the page title like this:
| PAGE TITLE | | SEPARATOR | | SITE NAME |
To do this, just select the correct tags. Similarly for meta descriptions, maybe combining the tags and information manually adds. For example.
On this page you will find all the articles of | SITE TITLE |
You will find the same logic in the “Taxonomies” sections, dedicated to categories and tags , and “Archives” , with the possibility of enabling different archives for different authors (in case, for example, your site has several authors) or the archive by date. In the “Archives” section you can also manage the titles of the search pages and the 404 page.
In the “Media” section you have the possibility to manage the url of the media and attachments . Whenever you upload multimedia content (an image or a video for example), WordPress not only saves the multimedia files, but creates an attachment URL. These attachment pages are typically blank, other than the media element and title. For this reason, if you don’t need to use attachment URLs, it’s best to disable them and redirect them to the media itself. The option is enabled by default.
The breadcrumbs are the “bricole di pane”, that is the indication offered to the user of his position with respect to the site map. To find out what exactly a bradcrumb is look at the title of this page; above you will find something like:
Home »Blog» WordPress »Yoast SEO for WordPress: the complete guide!
This is a breadcrumb. Activating them is simple: just click on “Enabled” in the “Breadcrumbs Settings” section. Entering them is more difficult : you need to follow this guide . For this kind of operations, it is better to rely on a professional! Alternatively, if your theme allows it, you can turn on theme breadcrumbs.
To go back to Yoast breadcrumbs, in the related section you can configure every aspect. From the separator between the breadcrumbs, to the name of the home page to display, to the taxonomies to show in the breadcrumbs for post types (for example, for articles I want the category: Home »Category» Article title to appear as taxonomy) and for taxonomies.
Finally, in the RSS section you can automatically add content to your feed. More specifically, Yoast explains, it’s designed to add links that lead back to your blog and articles, so scrapers automatically add those links themselves, helping search engines identify you as the original source of the content. This isn’t usually a crucial section, so you can leave everything as it is!
In the “Search Console” section you can allow Yoast SEO to retrieve your information on Google Search Console . Just enter the Google Authorization Code. To find out how to connect Yoast to Search Console, read this article .
In the “Social” section you can enter the url of all your social accounts (Facebook, Twitter, Instagram, etc.). This always fits the logic of providing the search engine with as much information as possible about your site. Google, Bing and others, in fact, need to understand who you are, and to do this, this kind of information is necessary. To connect social networks to your site, you can use this Yoast feature or a more specific plugin (as I said above, I use WP SEO Schema, which also offers this option).
Specific sections are also dedicated to Facebook , Twitter and Pinterest. In the “Facebook” tab you can activate the Open Graph , the Facebook metadata that allow you to view a preview with images and a text summary when a link of your site is shared on Facebook. It is also possible to upload a default image that the social network will use to generate the preview of the link.
Similarly, in the Twitter tab you can add the Twitter card metadata. Enable this feature if you want Twitter to show a preview with images and a text summary when a link on your site is shared.
Pinterest uses Open Graph metadata like Facebook, so make sure you have them activated in the appropriate section. Here you can validate your site with Pinterest by adding the appropriate meta tag here.
The tools: import, Robots.txt, htaccess and mass editor
Yoast SEO for WordPress provides its users with a set of powerful tools to control every aspect of their site. Between these:
- Import and export : you can export Yoast configurations from your site to another;
- Edit files : this section allows you to create and / or edit important files for SEO, such as robots.txt and .htaccess file;
- Editor ofbulk – you can quickly change the titles and descriptions of your posts and pages without having to go to the editor of each of them;
Particularly important is the section “Edit files” . Here you can first edit the content of your robots.txt file, which is used to provide valuable instructions to search engines. For example, if you want to block indexing of a page or section, type:
Disallow: / wp-admin /
Disallow: / page-title /
Of course, this section should only be changed if you are an expert. Otherwise, leave everything as it is. In robots you can also add the address of the sitemap, to quickly indicate it to the search engine, like this:
Sitemap: https://wpradar.com/sitemap_index.xml
If modifying robots.txt is a delicate matter, the htaccess file is even more so. It is a document that contains some Apache rules that give indications to the server on how to behave when a specific call occurs against a web document. For example, in htaccess redirects are managed, redirects from one resource to another. Or the caching rules are written by the plugins that perform this task. In short, better not get your hands on it if you are not an expert!
Use the Yoast SEO Meta Box
After the examination of the general configuration, accessible through the SEO menu item that appears in the sidebar of your control panel, all that remains is to examine the Yoast meta box .
The meta box is the section that appears immediately below the text editor on every page, every article, every taxonomy (unless, of course, you have not disabled it as we have seen before).
This consists of three sections: “Content optimization” (the symbol is the famous traffic light), “Social” (the sharing icon) and “Advanced” (the gear logo).
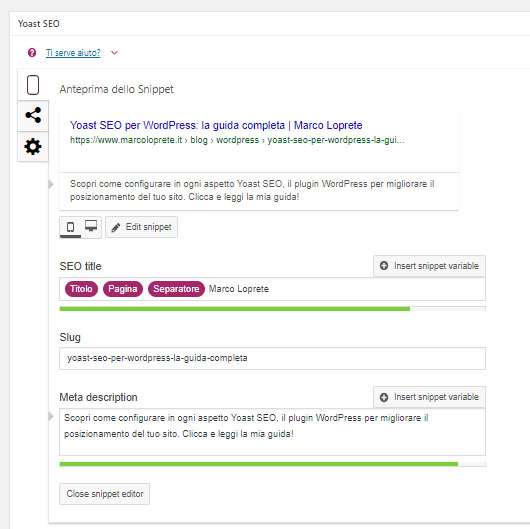
Content optimization: title, meta description and readability analysis
In the first tab, dedicated to the optimization of the contents, you will have the possibility to change the title tag and the meta description . If you are not satisfied with the title automatically generated by Yoast (according to the settings defined in the “Search appearance” section), you can click on it and edit it as you wish. Same thing for the meta description. Take into account the length of these two fields: it is advisable not to be too synthetic and not too verbose , both for reasons of completeness and fluency and for reasons of space. Too long titles and descriptions could be “cut” by search engines. Yoast, with a special indicator, will notify you if the title and description are of the correct length.
If you have left all the options in the SEO> General section active, here you will also find information on the readability of the text , the occurrence of the main keyword on which the content is set and the possibility of marking the content in question as “cornestone” . As I’ve already written, I prefer to get this kind of information from more powerful tools like Semrush, that’s why in my case these options are not active.
The second tab is dedicated to social media . Here you can customize the title, description and image that will appear on Facebook and Twitter . By changing these fields, you will overwrite the information that social networks derive from reading the page metadata. This is a useful option for, for example, creating catchy titles and descriptions of the right length. The rules of social networks are not those of search engines, and in general it is always advisable to think about the contents according to the channels on which they are conveyed.
In the “Advanced” section you can choose whether to allow search engines to show the content in question (be it page, article or taxonomy) in the search results. You will be able to choose whether to keep the general setting, defined in “Search appearance” or to derogate from it, providing an exception.
The question “Search engines should follow links…” refers to the application of the “nofollow” tag , with the possibility of preventing search engines from “following” the links in the article / page. This option is important if you want to manage link juice ; to know what it is, read my guide .
In this section you can also change the title of the article / page / taxonomy as the canonical URL appears in the breadcrumb, i.e. the address this page should point to. Leave blank to use the default permalink.
I left this question for last, because it was appropriate, in my opinion, to first give you a full review of Yoast’s basic functionality. Which also offers, for a fee , a further series of tools. I list them here:
- Redirect manager : the ability to conveniently manage redirects;
- Advanced context detection : the ability to optimize textual content also considering the synonyms and related forms of the main keyword;
- Internal linking : a tool that shows which posts are related and which, therefore, you could link to what you are working on;
- Social previews : the ability to preview the post as it appears on Facebook and Twitter;
- Orphaned content filter : “orphaned content” is content that is not linked anywhere, so they risk being unreachable for users and search engines. This Yoast feature helps you identify and value them;
- Stale cornerstone content filter : a system that allows you to monitor cornestone content to ensure constant updating;
- Support
Now, redirects can be managed either manually, through htaccess, or, if you are not an expert, through another plugin, Redirection , which is totally free. Functions such as advanced content detection and internal linking should be carried out with more advanced SEO tools, such as Semrush (but also SEOZoom , there are many). Yoast is not suited to a thorough examination of these aspects. The other functions (orphaned content filter and stale cornestone content filter) do not seem crucial to me. In short, the free version is more than enough.
If you need more power for your SEO, read many guides ( including mine ), learn how to use the most powerful professional tools on the market and, at worst, rely on a professional.
Conclusions
Well, we’ve finished our review of Yoast SEO, the perfect plugin for managing the crucial basic aspects of improving your WordPress site’s ranking. As I wrote from the beginning, this is a very important plugin but, in itself, not decisive.
Placing a site on a search engine is a complex and laborious activity , it involves taking into consideration many variables, so it would be naive to pretend that installing Yoast alone is enough. It is advisable to use more powerful (and specific) analysis tools, plan the structure and contents well, work on other very important aspects for SEO, such as speed and link popularity , which require tools other than Yoast.
Certainly though, Yoast SEO is a must for WordPress sites. I hope with this guide of mine to have given you the right indications and to have put you on the correct path. If you liked the article, please leave a rating below. If you are curious, you can leave a comment. Thanks!

