


How to Install and Configure WP Super Cache for WordPress – The speed of your website or blog is important if you want to compete with other sites in search engine results like Google. Because, Now search engines rank search results on the basis of your site’s page speed. If your website is not fast, it will greatly affect the SEO of your website or blog.

There are several ways you can speed up your WordPress website. However, a caching plugin can have a very good effect on increasing the speed of a WordPress site so that users will like your blog and blogs are visited . Using the best hosting will also greatly help increase website speed, and if added with the use of caching it will be even more perfect.
Besides using fast hosting, Centerklik also adds a caching plugin to get even better speed, WP Radar uses the WP Rocket plugin for caching. But here I will not discuss the WP Rocket plugin but the WP Super Cache plugin.
WP Super Cache is a free plugin that you can use without paying any fees, unlike WP Rocket which has a paid license with an annual payment. There is another option for the free Cache plugin that you can use which is W3 Total Cache , although the W3 total cache plugin gives better results than WP Super Cache, it has very complicated settings and one should be careful.
In my opinion, the WP Super Cache plugin can provide good results for speed optimization of your WordPress site, WP Super Cache has a number of features to speed up websites and has a very simple configuration page.
This plugin is also made by Automattic, a WordPress company owned by Matt Mullenweg, the founder of WordPress, of course this makes the WP Super Cache plugin one of the best in the WordPress library. Let’s go to the core discussion of this article, namely how to install and configure WP Super Cache.
How to install and setup the WP Super Cache plugin
To start using the WP Super Cache plugin, please enter your WordPress admin area and click the Plugins »Add New menu and type in the search field with the keyword“ WP Super Cache ”, if you find it, just install and activate the plugin.
After your plugin is activated, you will see a new menu called “WP Super Cache” which becomes a sub-menu of the Settings menu. Please click the WP Super Cache menu.
You will see WP Super Cache settings page and this plugin’s setup page is quite simple and will be easy for you even if you are a beginner even in the WordPress field. This WordPress cache plugin is probably the easiest plugin to configure compared to other plugins of its kind.
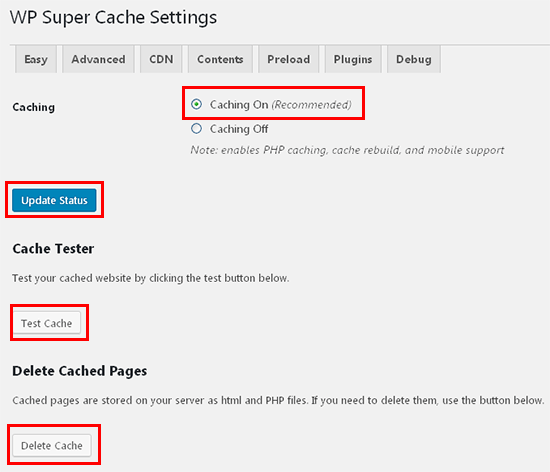
On the “ Easy ” tab menu in WP Super Cache’s settings page, you will see that the setting is still OFF, please select ON caching and click the “Update Statu” button for the plugin to start working.
And under the “Update Status” button there is a “Delete Cache” button, if you want to get a newer cache and delete the old cache, you just have to click on that button and the old cache will be cleared and the plugin will keep the newest cache.
Actually, by just doing the settings as above, your WordPress site is already caching and the speed of your site has changed to be faster. However, if you want to get even faster results, please keep following this guide.
Furthermore, on the menu tab ” Advanced “, you will see many settings that consist of a check box, where you have to check some of the options available. Please see the image below to get the right settings.
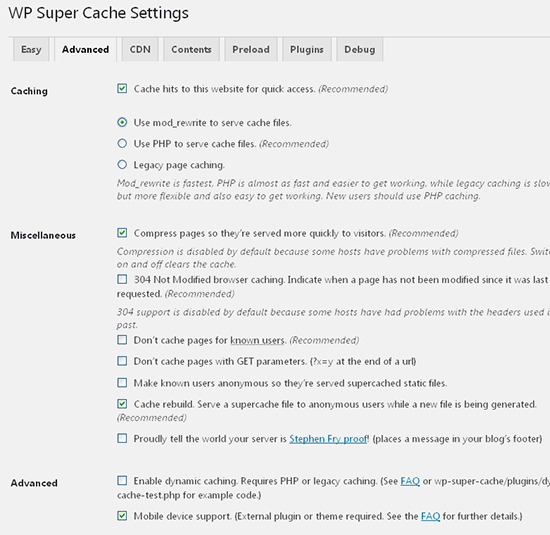
Below is an explanation of the setting options from the image above.
Cache hits to this website for quick access: Enabling this option is actually the same as when you select “ON” in the ” Easy ” tab menu. Just make sure that this is checked or checked if you want to make changes in the Advanced tab. (this option also says ” Recommended ” which means it is recommended to be activated).
Use mod_rewrite to serve cache file: Check this option to allow the fastest method to serve your visitor’s cache. But the developer recommends the PHP method for advanced users as well as beginners. But enabling mod_rewrite will be faster than the recommended options. But if you have trouble enabling this option, then you can change the option to the recommended one.
Compress Pages: Enabling this option will reduce the size of your page by compressing HTML, CSS, and JavaScript files. This will serve cache files faster for your visitors.
Rebuild Cache: Enabling this option will serve static HTML files to new users accessing. The files can also be referred to as super cache files.
Mobile Device Support: this will generate cache files for mobile users and enable caching for mobile devices as well.
When you are done with the settings in this section of the Advanced menu, please click the ” Update Status ” button to save all settings.
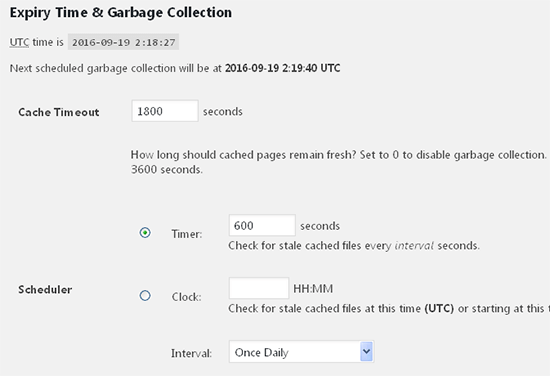
Part for ” Expiry Time & Garbage Collection “. You can set the time and frequency for garbage collection from cached files on your server. In this section, you can leave the settings at their defaults, because they are well-configured.
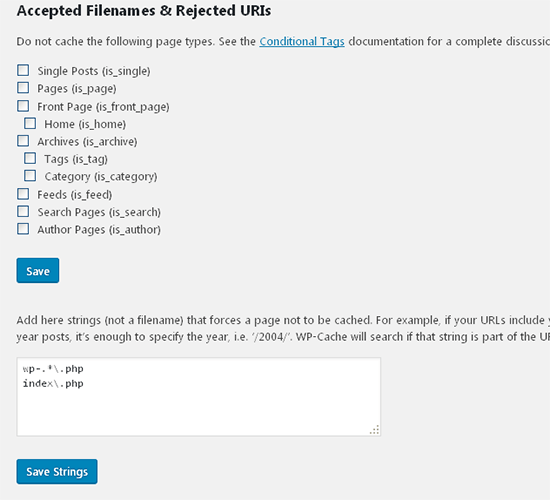
If you don’t want some types of pages or files that the WP Super Cache plugin doesn’t want to cache, then you can do your own settings according to your wishes in the ” Accepted Filenames and Rejected URIs ” section.

Furthermore, the “ Preload ” tab in WP Super Cache allows you to create a static Super Cache file for all WordPress posts and pages and those serving static WordPress websites. This is a highly recommended setting as it helps to save server resources, increases site speed by serving static content only. Also, it is very useful for serving old websites which are no longer being updated at this time. Make sure you have the same settings as in the image below.
And the configuration settings for the WP Super Cache plugin are now complete. To see whether this plugin is working or not, you can check it by clicking on the “Cache Test” button which is on the “Easy” tab menu. If all the results show “OK”, then you have successfully installed and configured the WP Super Cache plugin properly. And now try to refresh your website page to see the difference or try your website speed on sites like Google Page Speed or Pingdom tools.
For advanced settings such as CDN, I will not discuss these things here, you can do this easily if you use a CDN service for your WordPress site. You will get easy instructions when using CDN services.
Note: If you want to uninstall the WP Super Cache plugin, then when you uninstall it through the WordPress Dashboard it is not completely clean, you still have to change the permissions on the WP-Content folder to Writeable. Or you can delete the cache folder yourself and the files ” advanced-cache.php ” and ” cache-config.php “.
Above is a complete guide on how to install and setup the WP Super Cache WordPress plugin, please follow the instructions above to get your WordPress site accessed faster. Hopefully this article is useful and good luck. 🙂

