Do you want to increase the maximum file upload size in WordPress. This is often experienced and only just realized by WordPress users when they want to upload files, install plugins and themes from outside other than the list in the WordPress.org library.
With this limitation, you fail to upload a WordPress file, plugin or theme with a size above the limit set by the hosting server you are using. In this article, I will show you how to easily increase the maximum file upload size allowed in WordPress to fix the problem.
When you fail to upload because the file size The uploaded file exceeds the upload_max_filesize directive in php.ini .” And problems like this are often experienced by loyal readers of WP Radar and also buyers of cheap WordPress themes when installing themes with a size of more than 2 MB.
Note: This is an intermediate level tutorial. The method below may not work on some hosting types with shared hosting or shared hosting. However, you can still ask for help from the support section at your best hosting service provider to ask for help in increasing your upload capacity.
Read: How to Limit Characters in Article Titles in WordPress
How to Check Your Maximum File Upload Size Limit in WordPress?
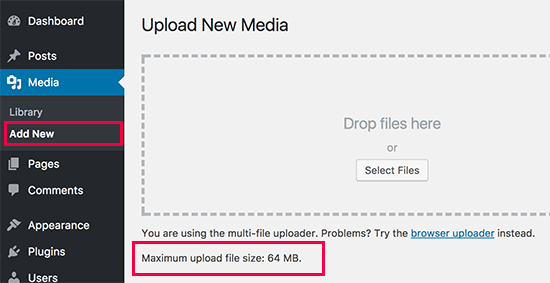
WordPress will automatically display the maximum file upload size limit when you upload images or media. To check, just go to Media »Add New and you will see the maximum file size limit for your WordPress site at the bottom of the upload box as shown in the following image:

The image above shows that the maximum upload is 64 MB and that is more than enough than you need so that your file upload does not fail. However, you will generally see that it is limited to 2 MB only.
Read: How to Change the Default WordPress Upload Folder Location
1. Edit File Functions
The first way is to try adding the code below to the Functions.php file in the WordPress theme file you are using. And this method usually works to increase the maximum file upload size in WordPress:
ini_set ('upload_max_size', '64M');
ini_set ('post_max_size', '64M');
ini_set ('max_execution_time', '300');
2. Create or Edit a php.ini file
If you are using Shared Hosting or shared hosting, of course you will not see the php.ini file in your directory. If you don’t see it, you can create a new file called php.ini and upload it in the root folder where your WordPress website files are placed. In the php.ini file write the following code:
upload_max_filesize = 64M
post_max_size = 64M
max_execution_time = 300
3. Edit the .htaccess file
Some people have tried using the .htaccess method by modifying the .htaccess file in the root directory, you can increase the maximum file upload size in WordPress. Please open or create an .htaccess file in the root folder and add the following code:
php_value upload_max_filesize 64M
php_value post_max_size 64M
php_value max_execution_time 300
php_value max_input_time 300
After you do a few tricks above, you will be able to see the changes and also be able to upload files up to 64MB. However, if on the Media → Add New page you only see that the size has been changed to the size of 64 MB but your file upload problem has not been resolved. That means you have to contact the support department of the web hosting you are using.
Once again I remind you it is important that we emphasize that if you are on a shared hosting package this technique may not work. In this case, you will need to contact the support department of your web hosting provider to increase the WordPress file upload limit for your site.
Chances are there are one or two hosts that have completely rejected their users in terms of increasing the maximum upload file size. If you experience rejection, you should move your hosting to a better hosting provider as listed in the deals list. These hosts will provide support to help solve this problem quickly and happily.


