


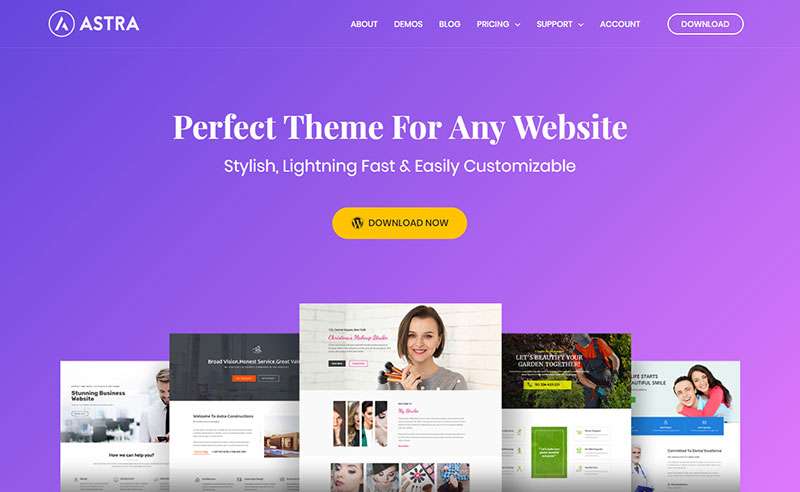
Today I’m going to tell you about what I consider, Astra WordPress theme to be the best theme. It is a theme developed by Brainstorm Force, an Indian company specializing in WordPress products.
Astra is a theme I love, in the last six months I have started using it steadily for my web projects. The website you are browsing is made with Astra!
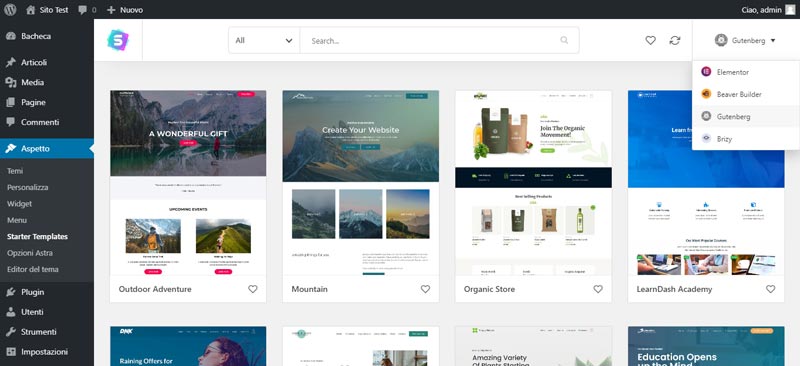
Specifically, I use it in conjunction with Gutenberg, the native WordPress block editor (but Elementor , Beaver and Brizy can also be used) along with Gutenberg’s Ultimate Addons , which extend its functionality. Result? Very fast, light sites, developed with very few plugins, infinitely customizable.
The question of speed, in particular, is crucial for me. I’m a Web Marketing Consultant, which means I’m not limited to making websites. My goal is to create effective websites that are well positioned on search engines . For both of these objectives, which are decisive for you that you have a company or are a freelancer eager to increase your business, it is essential to have a performing site . Creating a web project by fully exploiting the potential of Astra with Gutenberg and limiting plugins to a minimum is therefore very important!
In this guide / review, I will explain all the features of Astra, from the difference between the free and paid plan to compatible plugins to the complete customization of the various sections. Ultimately, you will have a complete overview of what many consider to be the best WordPress theme! If you are a colleague, your way of building sites in WordPress will completely change 😊 All the others will have, instead, a new reference standard.
As always, I invite you to read my two fundamental guides: the Complete Guide to WordPress and the “First on Google” guide, to improve your SEO positioning.
What is Astra and what are its characteristics
Astra is a WordPress theme. It is one of the most popular (over a million users) and is considered by many experts to be among the fastest themes for WordPress . I simply consider it the best.
Its strengths:
- Performance focused: Astra uses Vanilla JavaScript , which avoids the annoying jQuery render blocking that often negatively affects performance.
- Ultra-speed: I won’t tell you gossip. Run the Pingdom test on my site – it loads in less than half a second!
- Ultralight: Astra weighs very little, less than 50kb, half of a standard WordPress theme !
- Optimized Code: The Astra team pays particular attention to the quality of the programming code . Never encountered bugs or malfunctions! In addition, it offers (we’ll see later) a series of functions that optimize inline CSS, ensuring optimal performance.
From a design standpoint, the possibilities are practically endless . You can literally customize every aspect of the site without coding . Layout, sidebar, header and page headers, colors, typography, footer. The functions we will see in detail later. For now, just know that if you love to take care of the design of each project in detail, with Astra you can indulge yourself . You can design your template from scratch or rely on a series of already structured templates (in the PRO version).
Astra is also perfectly compatible with WooCommerce , in case you want to use it to create your online store: I’ll talk about it at length later. If you intend to create an online course site , you will also have LifterLMS or LearnDash , two of the best plugins in the industry (in the PRO version).
Finally, support is available and on time . And anyway, you probably won’t need it, given the plethora of video guides and articles dedicated to explaining every little aspect of Astra .
Read the full list of features to find out more! Before going into the details of how this which I think is the best WordPress theme, let’s take a look at the differences between the free plan and the paid version .
Astra Free VS Pro
For “non-professional” users, Astra is available in two versions: free and Pro.
The free version of the theme can be downloaded at this link ; you can buy the Pro package here (you have 14 days to withdraw from the purchase and get your money back ).
The differences are manifold. First of all, less possibility of customization of the various graphic aspects (for example: colors, fonts, spacing management, blog templates, custom layout of the header, of the footer, etc.) and less integration with very powerful plugins such as WooCommerce, LifterLMS , LearnDash and Easy Digital Downloads (more on that later). Check out this page for a comparison between the two packages!
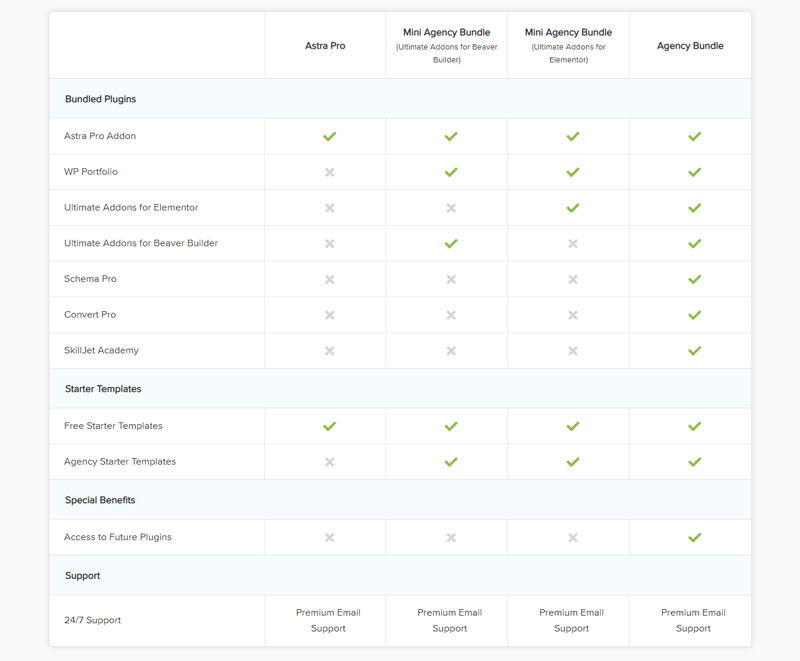
For freelancers and agencies , Brainstorm offers two additional packages : Mini Agency Bundle and Agency Bundle .
The Miny Agency Bundle package includes all the features of the Pro package, including the Astra Pro Addon and WP Portfolio plugins, plus the Starter Templates (i.e. the preset templates, there are over 55, about 30 more than those available in the Pro package ) and the Ultimate Addons from one of the builders between Elementor or Beaver (in addition to those of Gutenberg, of course).
The Agency Bundle is the top. In addition to the features of the Mini package, it also includes the Ultimate Addons of all builders , and the Convert Pro and Schema Pro plugins. Finally, access to the SkillJet Academy, a library of online courses specifically designed for web design professionals.
How much do these packages cost? Click here to find out the prices!
How to install Astra on WordPress
The package I have currently activated is the top, Agency Bundle . And it is about this package that I will talk to you in the guide, to show you all the features of Astra.
Anyway, let’s start from the beginning, the installation. If you’ve read my complete guide to WordPress, you’ll know very well how to install a theme . For the more distracted, I repeat it below:
- Download the theme zip archive. I remind you that the free version can be downloaded from here , while the Pro packages can be purchased here . In the latter case, once the payment has been made you will get credentials and in the download section you can download the Astra Theme zip package.
- Log into your WordPress site’s control panel
- Go to Appearance> Themes> Add New> Upload Theme
- Add the package you want to install and click on “Install now”
And here is the successfully installed theme!
Generate and install the Astra Child theme
The Astra child theme is only available in the Pro package . It is a very useful feature, because it allows you to generate a custom child theme in the name, in the preview image, even in the metadata (version of the theme, author, etc.) .
(In case you didn’t know, the child theme is great when making changes to the original templates or stylesheets, because updating the parent theme doesn’t override them. Read the official WordPress guide to child themes to learn more. ! )
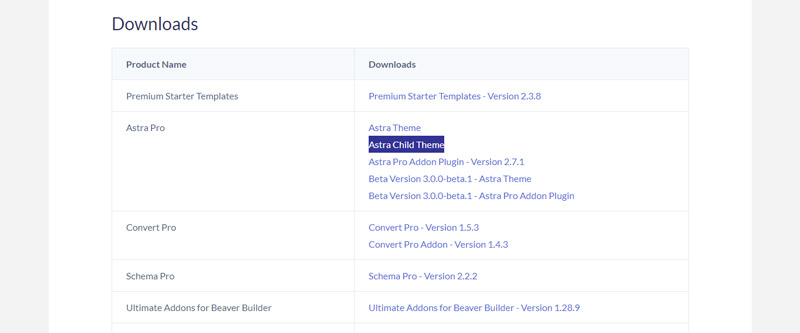
To generate the Child Theme, go to the “Download” section of the Astra website and click on “Astra Child Theme” .
The next screen consists of a field in which to enter the name of the Child Theme. You click on “Advanced Options” . You will have access to the screen where you can enter all the data of the Child Theme, to customize it.
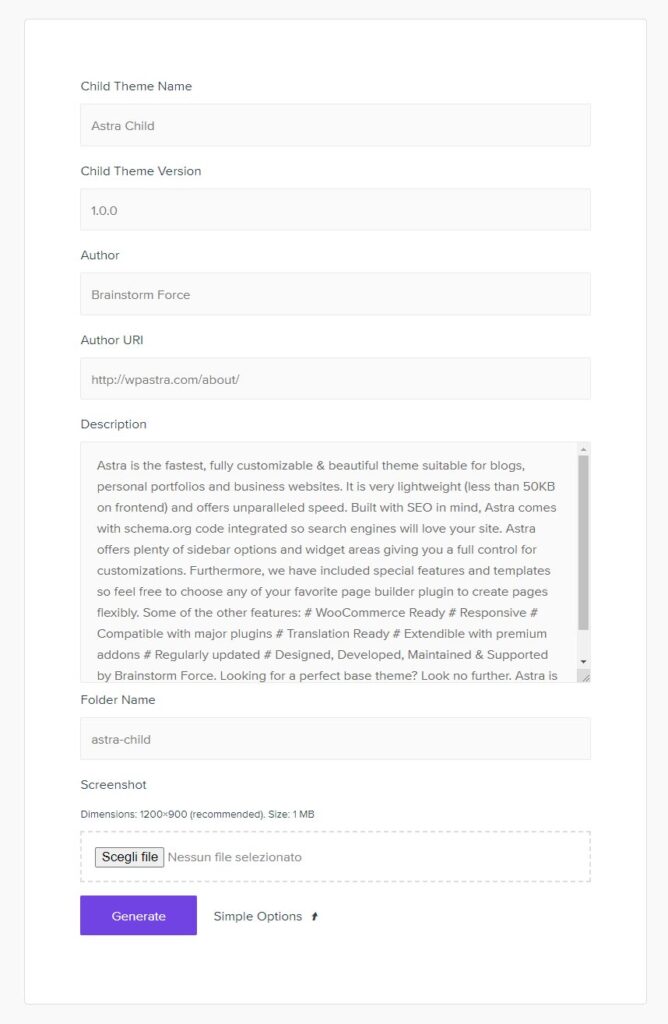
Be careful when uploading the theme preview image: remember that it must be 1200 × 900 in size!
By clicking on the “Generate” button, you will be able to download the .zip file of your Astra child theme. It must be installed and activated according to the standard procedure, seen in the previous point.
If we talk about metadata customization, Astra offers another option (which is complementary and not alternative to the child theme), the white label (I’ll talk about it later).
Now, let’s go see the first configurations!
Astra Pro Addon Plugin
Astra Pro Addon Plugin is Astra’s main plugin. As the name implies, it is only available for Pro packages ( Pro , Mini Agency Bundle , Agency Bundle ). Its functionality is to give access to all possible customizations of the theme. You can get a first idea by looking at this link . We will see the details of the customization possibilities in the section dedicated to Astra options.
The installation procedure is the one valid for all plugins. After downloading the zip file from the “Download” section of Astra, go to the control panel of the site, click on “Plugin” and upload the archive. After the installation procedure, activate the plugin.
Premium Starter Templates
Astra offers users a package of pre-structured templates for any need. You can find them at this link , divided by builder ( Gutenberg , Elementor , Beaver , Brizy ).
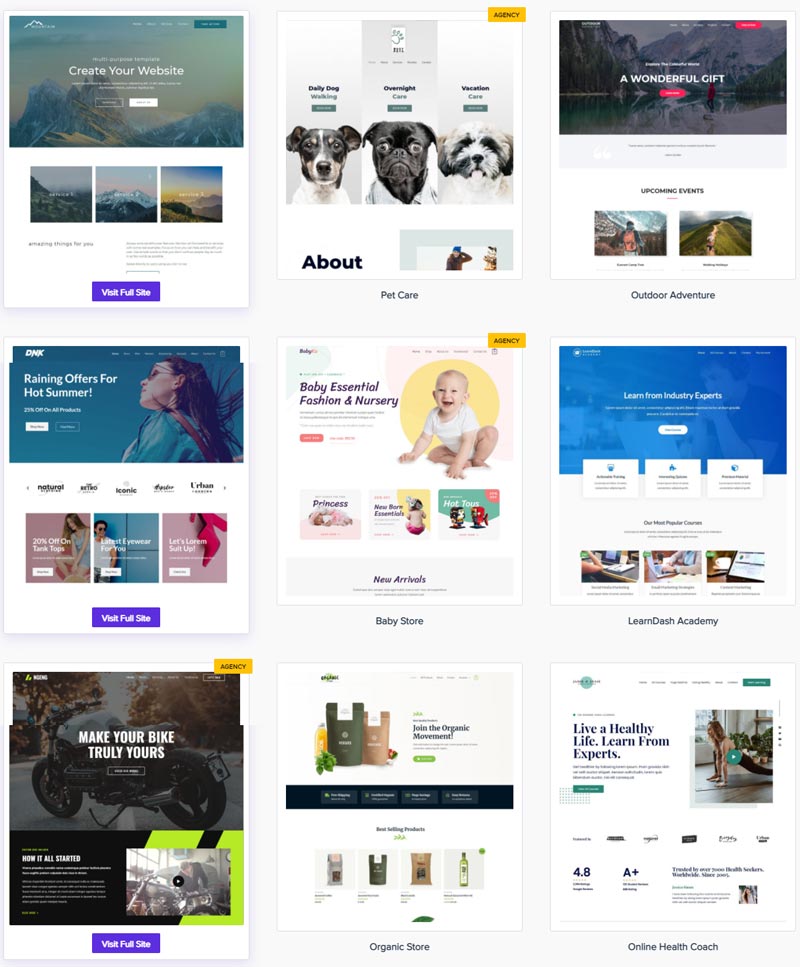
The free version and the Pro version offer a limited number of these templates . Agency packages make over 55 available.
To install them you need to download the “Premium Starter Templates” plugin, always available in the “Download” section. Once installed from your control panel, the “Starter Templates” item will appear in the “Appearance” section. Here you can choose the builder you want to use: Gutenberg, Elementor, Beaver and Brizy.
You will then arrive at the screen where all the templates that use that builder are present.
However, you will always have the possibility to modify the chosen builder via the menu at the top right.
At this point, all you have to do is choose the theme you want. Click on it and you will have the possibility to:
- See an example of a site structured with that template
- Import the complete site
- Import only a specific page
I remind you that in the Agency packages there are also addons for Elementor and Beaver , plugins that extend the functionality of the builders.
Astra options
At this point let’s get to the heart of this guide / review to Astra for WordPress. Before accessing the actual customization of the theme, let’s take a look at the options available to us and activate the desired ones.
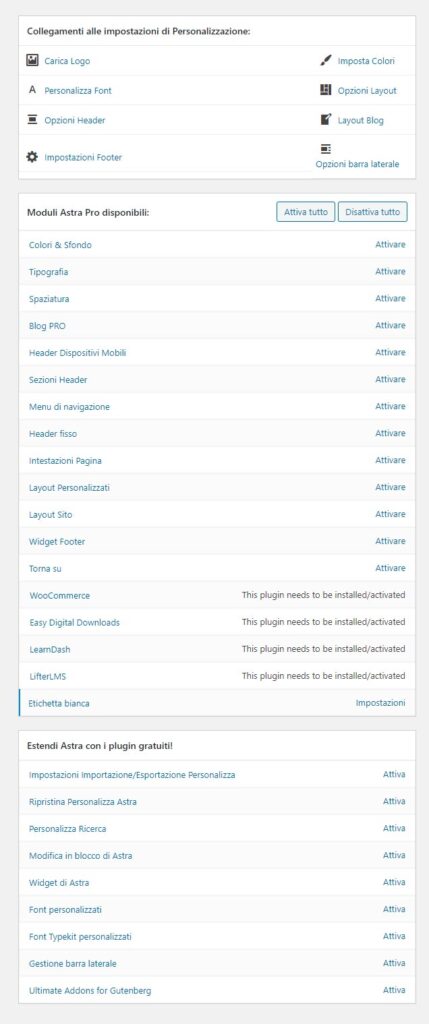
In the Appearance> Astra Options section you have the links “Customization Settings Links” , the “Available Astra Pro Modules” and a number of free plugins that extend Astra’s functionality.
Let’s go through the three blocks one by one.
The “Links to Personalization settings” are:
- Upload Logo
- Set Colors
- Customize Font
- Layout options
- Header options
- Blog layout
- Footer settings
- Sidebar options
These options can also be accessed from the Appearance> Customize section. Let’s say that these are the essential links, the things that are set up in the first instance in a web project.
In the “Available Astra Pro Modules” section, we find some juicy opportunities to make our Astra theme even more personalized. Here is the list of modules:
- Colors & Background
- Typography
- Spacing
- Blog PRO
- Mobile Devices Header
- Header sections
- Navigation menu
- Fixed header
- Page headings
- Custom Layouts
- Site Layout
- Footer widget
- WooCommerce
- Easy Digital Downloads
- LearnDash
- LifterLMS
- White label
You can choose to activate or deactivate all modules together with the respective buttons. Alternatively, you can activate the single module by clicking on the corresponding “Activate” link.
Keep in mind that the WooCommerce, Easy Digital Downloads, LearnDash and LifterLMS modules first need to install the relevant plugins.
Let’s go through these modules one by one!
Colors and background
Design and aesthetics are essential parts of any website. The “Colors and Background” module extends the basic customization options. By activating it, in particular, in the Appearance> Customize menu, you can change the colors and background of these sections:
- Global> Colors> Container
- Header> Site Identity
- Header> Main Header
- Header> Main Menu
- Blog> Blog / Archive
- Blog> Single article
- Sidebar
Typography
Typography management (font, size, line spacing, styles, text transform etc.) can also take place at the builder level, but it is much better to manage it, as far as possible, in the general settings of the theme, to ensure a uniform style throughout the site.
Now, the basic typography settings are accessible in the Appearance> Customize section and relate to body and content ( “Basic Typography” ) and titles ( “Headings” ). The “Typography” module expands the available possibilities, and adds the management of typographic elements also:
- In the menu: Header> Main menu> Fonts
- In the buttons: Global> Buttons> Fonts
- In the blog archive pages: Blog> Blog / archive> Typography
- In the single article: Blog> Single article> Typography
- In the sidebar widgets: Sidebar
- In footer widgets: Footer
Spacing
The “Spacing” addon allows you to manage the margin and padding for various elements available with Astra. The default values for the theme will be overridden by the values entered here.
The add-on will add a spacing control option to the following items:
- Identity of the site
- Container
- Heading
- Blog archive
- Sidebar
- Footer
Exactly what possibilities will we have?
Spacing unit
You can select a unit of spacing between PX (pixel), EM (relative to the font size of the element),% (percentage) according to your preference.
Responsive spacing options
You can set different spacing values for different devices (PC, smartphone, tablet). Once the device is selected, you can enter values for the four directions: up, down, right, left.
Connector
The spacing control features a chain icon which, when clicked, will connect all 4 spacing options (Top, Right, Bottom,Left) together, applying the same spacing value to all sides.
If the connector is unchecked, you can add different values for each side.
Blog PRO
In the Customize> Blog section, the Astra theme provides a number of basic options to style the blog archive (the taxonomy pages) and the individual post . In particular, the options concern:
- the width of the content
- the preview elements of the article that are displayed ( image, title, meta and summary )
- some typographic elements
The Blog PRO module, if activated, adds more customization options concerning:
- the layout , with the ability to change the standard content view
- the length of the summary content to preview on archive pages
- the text of the “Read more” (always in the archive pages)
- the style of pagination
- the size of the featured image
- the spacing
- typographic elements
- inserting the block with the author’s info (in the single post)
- the auto load of the next post , which is loaded immediately after the current one (ditto)
Mobile Devices Header
How many times have you wanted to change the header display on mobile devices ? Well, Astra offers you this possibility by activating the “Header Mobile Devices” option.
The options available to you will allow you to:
- change the breakpoint (the breakpoint, beyond which the floating menu is activated)
- set a different logo for the mobile
- choose different styles from the menu
- set the menu colors
Header sections
The Header Sections module introduces two header sections ( above and below the header ) into your website. These are useful options to show call to action, contact details, social media icons etc.
In both cases, there are two layouts available: two-section ( text / html , widget , search , menu or nothing ) and one-section (as above).
The adjustments available to you include:
- section height
- edge
- character
- possibility to display or not the top bar on the cabinet (and eventually replace the elements)
Not all WordPress themes offer the ability to create mega menus . Sometimes it may be necessary to install an additional plugin, with all that this entails (time, code burdening, potential conflicts / incompatibilities, etc.). If Astra is the best theme for WordPress it is also because of the attention it puts into these details.
So, once you have activated the “Navigation Menu” function from the “Astra Options” section, go to Appearance> Menu to create your mega menu.
Always keep in mind that the mega menu works if the menu has the following structures:
Main item
Child entry 1
Child entry 2
Child entry 3
Main item 2
Child entry 4
Child entry 5
Child voice 6
etc.
Or:
Main item
Child entry 1
Child entry 1-1
Child entry 1-2
Child entry 1-3
Child entry 2
Child voice 2-1
Child voice 2-2
Child item 2-3
etc.
So we distinguish between main ( first level ) and child ( second and third level ) voices.
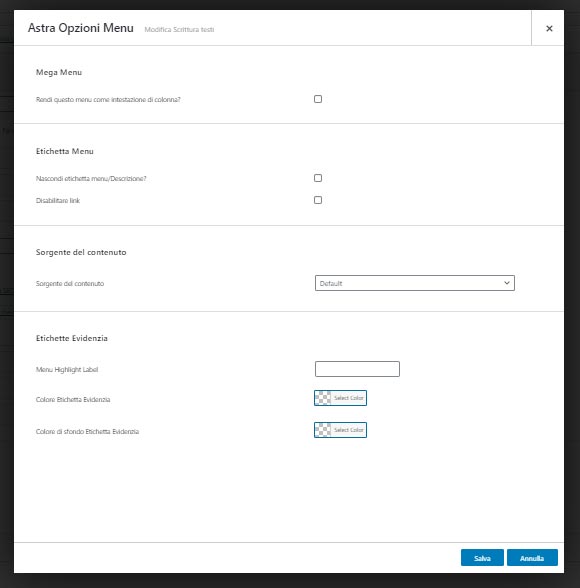
Then, once you have selected the menu you want to work on, click on the main item and from there on the “Astra menu settings” button. Tick the “Enable mega menu” box .
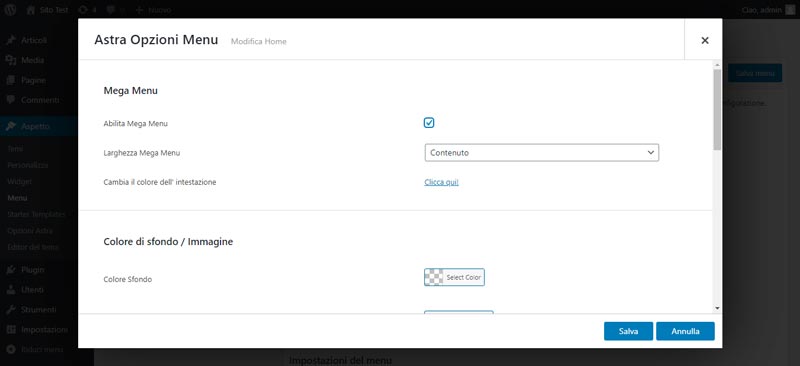
As you can also see from the image, you have a number of options available. You can define the mega menu width ( Content – Menu container width – Full width – Full width stretched ), the background color or image , you can change the colors ( links and column dividers ) or add a label to the item .
When you have changed what you want to change, click on “Save” .
Then go on to work on the child items, always clicking on “Astra Settings Menu” . You will have the ability to define if the item in question is column header , hide the menu label and even delete the link , define a content source ( custom text , template , widget ) and highlight label .
Now, I don’t want to dwell too much on the process of creating a mega menu with Astra because that is not the purpose of the guide. If you need help, you can leave a comment at the bottom of the page or write me. Here are two examples of what you can do ; the second, in particular, takes advantage of another Astra function, the creation of customized layouts , which can also be applied to mega menus (using the “Content source” function).
Fixed header
The “fixed header” is the sticky header , the one that scrolls with you when you scroll down the page. You can enable it by activating the appropriate Astra option. To manage it, go to Customize> Header> Fixed Header .
Here you can, among other things, enable the option , choose a different logo for the “sticky” phase , enable or disable the reduction effect when the header scrolls, hide the header when scrolling down , select an effect animation , apply the fixed header only on some devices , change the colors .
Page headers
With this option active you can design the page titles or the entire header , inserting breadcrumbs and changing background colors and images . You can also choose to apply the new layouts to the entire site or just to some pages .
Once the option is activated, you will find it in the “Appearance” menu with its specific item. By clicking on “Add new” , you can create your new header.
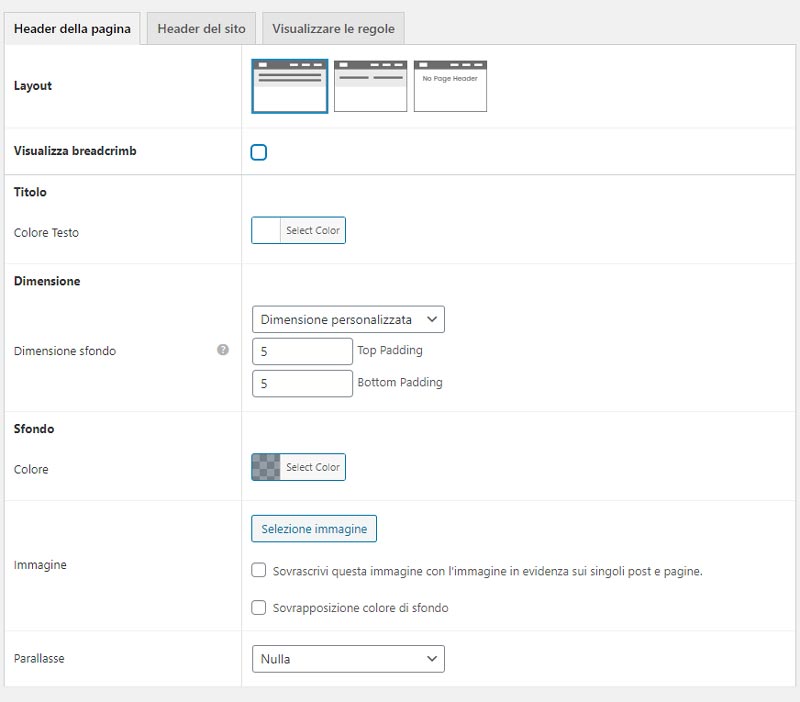
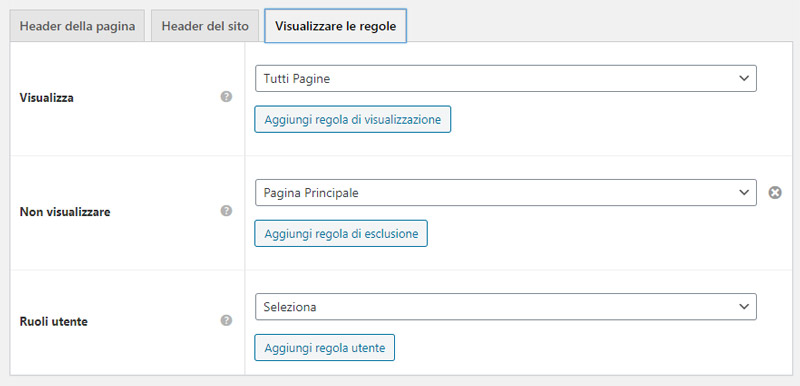
The screen is divided into three tabs: Page Header, Site Header , View Rules .
In the first tab we have everything we need to design the header of our content. We can choose a layout ( central alignment, side alignment, no header ), whether or not to show the breadcrumb , the color of the title and breadcrumb , the background color or the image (it is also possible to set the highlighted image of each page).
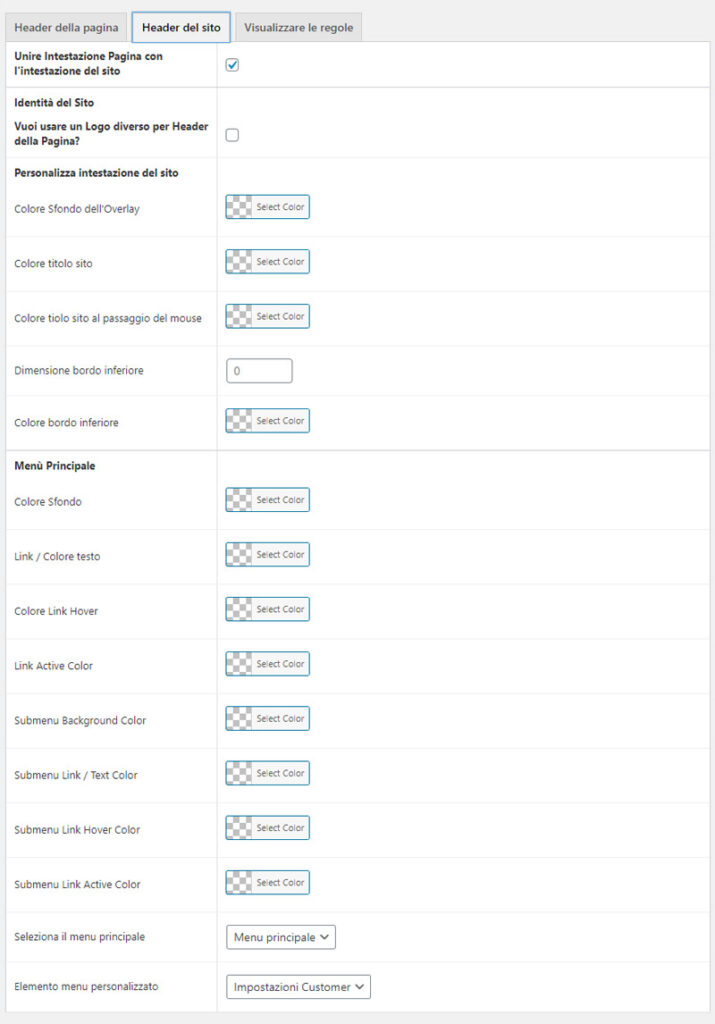
In the second tab, by flagging the box “Merge Page Header with the site header” , it is possible to change the header of the whole site , overwriting the rules that we have given so far. It is not mandatory, so much so that by default the option is not activated, but for some types of content you may want to change not only the title but also the actual header.
The third tab is that of the display rules . In what cases do we show the header (and the new header)? We can choose: all pages, only special pages, all articles, all archives etc. We can also add exclusion rules : for example, all pages except the home page. Finally, we can set a display rule based on the type of user (administrator, editor, author, etc.).
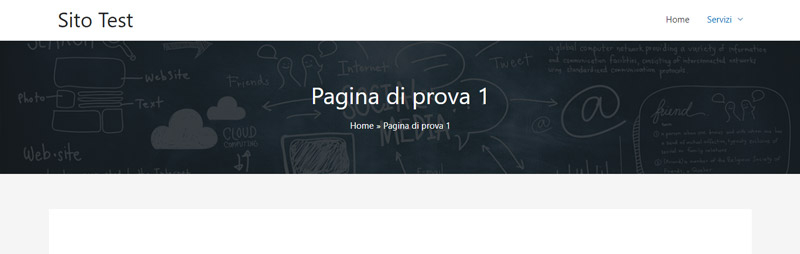
Here I show you a small example of a page header that I created with this very very useful tool!
Custom layouts
This option is one of Astra’s strengths. It allows you to create customized headers and footers, 404 pages or to add code snippets in strategic points of the site.
Once the option is activated, the “Custom Layouts” item is created immediately under “Astra Options” (in “Appearance”).
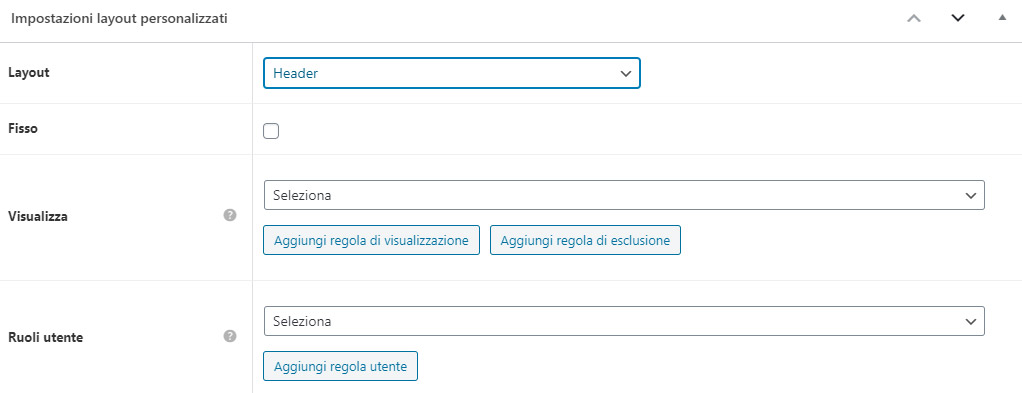
In the screen that opens, at the bottom, you can select one of four options:
- Header
- Footer
- Page 404
- Hooks
If you select “Header” , you can create the new site header through the theme builder (Gutenberg, Element, Beaver and Brizy) or in html . You can choose whether the header should be fixed or not , in which type of content to display it (the whole site or specific sections) and for which type of user .
Same goes for the footer.
If you select “Page 404” , you can create the page to show when a resource is not available. Also, you can disable the primary header or footer , to make the page as simple as possible.
The “Hooks” section is very interesting. You can insert code snippets here to show at specific points on the site . Which ones are they? These .
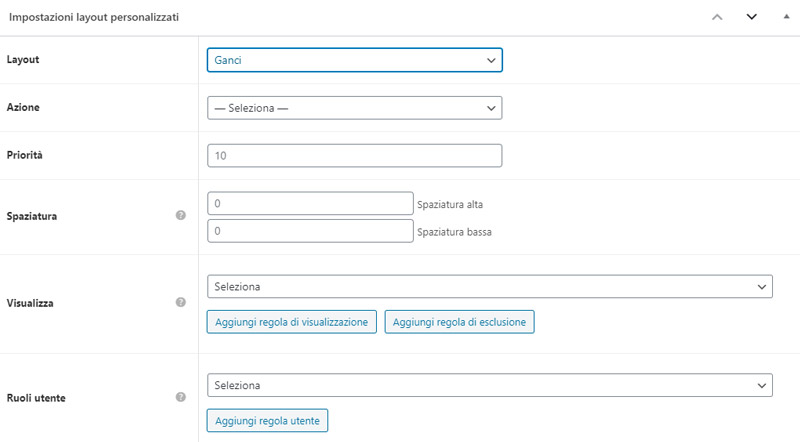
You have a number of options:
- Priority: If multiple items are active for a given action, the priority decides which item is executed first. The lower the number, the higher the priority.
- Spacing: Adds top and bottom space
- View: where to view the content in question
- User roles: what type of user can see the content in question
Site layout
This option allows you to choose the layout to apply to the external wrapper of the site . You have four possibilities:
- Full width
- Max width
- Padded
- Fluid
You can select one of these layouts in Appearance> Customize> Global> Container .
This is an option that extends the customization of the site footer . Activating it, you will find in the Appearance> Customize> Footer> Footer widgets section a series of possibilities:
- 7 different footer layouts
- Ability to define the width, spacing, size and color of the top border
- Change the background and content colors
- Change the font and its characteristics
Come back upstairs
Allows you to activate the “scroll to top” button , that is the small button which, typically positioned at the bottom right, allows, if clicked, to go back to the top of the page.
Once the option is activated, in the Appearance> Customize> Global> Back to section section, you can:
- enable the button only on desktop, only on mobile or on both devices
- define the position (right or left)
- define the size of the icon
- define the radius of the edge
- customize the icon color
WooCommerce
We come to the options that need an external plugin to be activated. This, in particular, is a function that ensures the integration between Astra and WooCommerce , the most popular WordPress plugin for creating and managing online shops .
By activating the option, the WooCommerce item will appear in the “Appearance” section. Among the sections on which you can act, I would like to point out:
- General
- Catalogue
- Single product
- Payment
Let’s see them one by one.
General
- Sale notification: when you add a discounted product to the shop, the product will automatically be marked with the “On offer” sticker. If you want to change this content, select “Custom String” . For example, you can set the value of the discount (eg -15%), or enter another text (eg “Discount!”). You can also deactivate the sticker.
- Sales cloud style: allows you to change the appearance of the discount sticker. You can choose from: circle, circle outline, square, square outline.
- Cart Icon in Header: There are four different types of icons including for the cart: Default , Cart , Bag , Trash . It is also possible to change the style (Outline, Fill, Nothing). You can also choose whether to show the cart total and cart title.
- Product Rating Color: If reviews are active for your products, you can change the color of the stars with this setting.
Catalogue
The options available (many!) Allow you to intervene on the “Shop” page (or “Shop” or whatever you called it). Let’s see the main ones.
First, the layout . You can choose between a grid view and a list view by selecting the number of columns.
You can define the number of products to load on the page and the items to display. Or:
- Category
- Title
- Evaluations
- Price
- Add to Cart
- Short description
You can select or deselect each field by clicking on the eye icon.
You can also choose the alignment of the content (right, left, center) and any shadow effect under the product box , even in hover.
Then there is the pagination . If you have chosen not to show all the products on a single page, you can activate pagination, also customizing the graphic aspect. Alternatively, you can opt for infinite scrolling .
The options don’t stop there: discover them for yourself and build your perfect product catalog with Astra and WooCommerce!
Single product
It’s about customizing the page of the single product , starting with the layout of the image gallery : you can choose horizontal or vertical orientation.
You can also choose which information to show:
- Title
- Evaluations
- Price
- Short description
- Add to Cart
- Half
The activation and deactivation mechanism is identical to that seen in the previous paragraph.
You can choose whether to activate or deactivate the breadcrumb , the zoom on the image, whether or not to show the product sheets with description and reviews (and possibly with which layout), the related products and finally customize all the graphic aspects (colors and typography).
Payment
These options allow you to change the look of the WooCommerce checkout process . In particular, you can:
- change the width of the checkout module (default or customized)
- show or not the “Company name” field
- show or not the “Address line 2” field
- choose whether to make the “Telephone” field mandatory, optional or hidden
- highlight or not the required fields with an asterisk
- indicate the page with the privacy policy and the terms and conditions
- choose whether or not to enable the “two step” mode for the checkout, separating the billing details and order payment into two pages or inserting them on a single page (default option)
- show or not the order notes
- show or not the coupon field
- hide the menu from the header , to enable a distraction-free version of the page
- use field labels as placeholders
- make sure that the content of the billing fields is persistent , so that it is not lost even in the event of an involuntary page refresh
Easy Digital Downloads
Easy Digital Downloads is a complete e-commerce solution for selling digital products on WordPress . The Astra addon offers solutions to customize the EDD store style. Let’s see how!
Once you have installed the plugin and activated the module, go to Appearance> Customize> Easy Digital Downloads . There are four sections on which to intervene:
- General
- Product Archive
- Single Product
- Checkout page
The options available are very similar to those of WooCommerce (albeit to a lesser extent).
LearnDash
LearnDash is a plugin for creating and selling online courses . This is a very powerful plugin that is only available for a fee. To get an idea of its potential, take a look at the official website .
Once purchased and activated, by activating the Astra LMS module you can also change these options:
- Distraction-free learning : Activating the distraction-free learning option removes the navigation menu links from the header and footer of individual LearnDash courses, topics, lessons and quizzes. In this way, the contents will be presented in a simple and clean format.
- Student Gravatar in Primary Header : Personalize the experience of your students who are logged into your website LearnDash will display their public Gravatar image. You can link this image to any URL, such as the “My Account” page.
- Border radius, typography and colors of the Table of content : you can choose to make the edges more or less rounded, change the font characteristics and colors.
LifterLMS
Like LearnDash, LifterLMS allows you to create an e-learning platform . Also in this case we are faced with a paid product. More information can be found on the official website .
Activated onAstra module for LifterLMS you will have many functions available. In addition to the possibility of graphic customization, I would like to point out others:
- Membership Columns: LifterLMS allows you to choose various subscriptions for the courses you offer. Astra Pro addon for LifterLMS helps you manage membership viewing settings.
- Distraction free checkout and distraction free learning: As with LearnDash, you can enable a “distraction free” version of the course and checkout pages. This means no headers, footers, sidebars and any other distracting elements.
- Distinction between student view and simple user view , with the ability to customize different sections
White label
This is one of Astra’s coolest modules, especially if you are a website developer. What is the “white label” ? It is the ability to rename and present a product or plugin as yours . This option helps you hide the actual identity of the theme and plugins used and allows you to use your own branding instead.
In other words: via this Astra option you can change almost any field to prove that the product is yours and you are the entire and only developer who has worked on a website!
Once the module is activated, you will be able to enter your agency data, change the name, description and screenshot of the theme, change the name of the Astra Pro plugin and the description of the plugin . Same goes for the preset themes plugin .
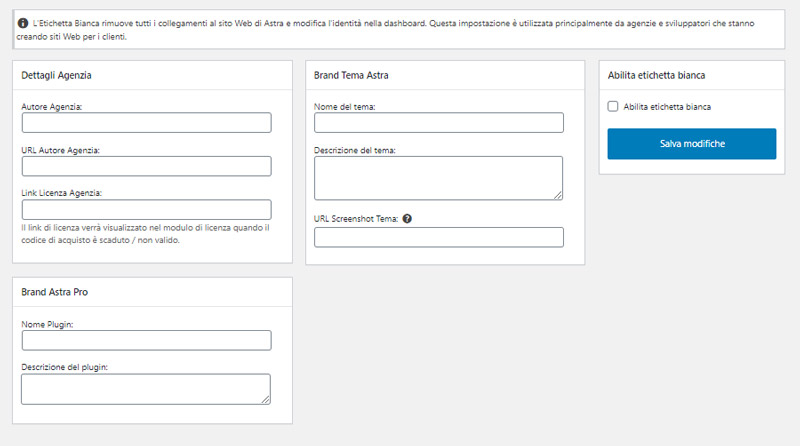
Also, by selecting the option “Enable white label” , the default information of Astra will be overwritten and the module will no longer be available in the options section. To change these fields again you will need to deactivate and reactivate the Astra Pro plugin.
The white label is also active for the following plugins / modules:
- Astra Hooks
- Custom Fonts
- Custom Typekit Fonts
- Lightweight Sidebar Manager
Important: the white label does not change the code. Therefore, by analyzing the source of the site the references to Astra will remain. If this is a problem for you, read here .
Extend Astra with free plugins
Also in the “Astra Options” section you have the possibility to activate a series of free plugins . Let’s see them briefly:
- Customize Import / Export Settings: allows you to export or import the customizations made on your Astra theme, so you can create your websites faster;
- Reset Customize Astra: allows you to reset all Astra settings and return to the default ones with a single click;
- Customize Search: it is a plugin that activates a search field in the “Customize” section, to allow you to find the options you are looking for more quickly;
- Astra Bulk Edit: This is useful for changing certain Astra settings on multiple pages / posts at the same time. For example: enable or disable the page title or change the layout. In this way, you avoid opening each page / post to edit it;
- Astra Widget: adds three very useful widgets in the “Widget” section: Astra Address, Astra List Icons and Astra Social Profiles, perfect to use in the footer.
- Custom Fonts: This plugin helps you to easily embed font files (woff2, woff, ttf, svg, eot, otf);
- Custom Typekit fonts: allows you to easily embed Adobe fonts on your WordPress site;
- Sidebar management: create all the sidebars you want and associate them with the pages / posts where you want to show them;
- Ultimate Addons for Gutenberg : Perhaps the most useful plugin of the lot. It extends the capabilities of Gutenberg by adding a whole series of advanced blocks. Which? Discover them on the official website!
An advanced option: CSS File Generation
Astra is famously one of the fastest WordPress themes. However, it is possible to further improve the basic performance by activating the “CSS File Generator” option, also present in the “Astra Options” section.
Up until the 2.0 update, whenever changes were made to the website using the Astra customizer, the theme generated an inline CSS , i.e. it inserted the style rules directly into the html via the

