


Complete Guide on How to Use an FTP Client [FileZilla] – When you read tutorials about WordPress both on WP Radar and from other blogs, you will often read about using an FTP client to upload to a web hosting server directory or to install WordPress plugins and themes. This FTP software is software that you must install on your computer if you often work with the web. Because this FTP software can help you manage your website files on the hosting server more easily.
Actually, managing your website on a web hosting server can be through a web browser , but sometimes through a web browser it runs very slowly, and unprotected downloads are also not recommended to upload or download large files.
The FTP client software that I will use in this guide is FileZilla, FileZilla is a popular free FTP software, supports various operating systems and is easy to use. I personally manage this WP Radar WordPress blog file also using FileZilla. You can also try to find other FTP software if you don’t want to use FileZilla. Please read in my other articles below.
FileZilla FTP feature
Some of the advantages of FileZilla apart from being free to use are that it is very user friendly and you can easily upload, download and manage files and folders. FileZilla also has a good level of security because it can encrypt and protect your data during connection to the server. And below are the full features of FileZilla FTP:
- User friendly interface and easy to use
- Supports FTP, FTP over SSL / TLS (FTPS and FTPES) and SSH File Transfer Protocol (SFTP)
- Available for Windows, Linux , BSD, Mac OS X and more
- Multi languages support
- Supports resume and transfer of large files
- Site Manager and transfer queue
- Bookmarks
- Drag & drop support
- Adjustable transfer speed limits
- Filename filters
- Directory comparison
- Network configuration wizard
- Remote file editing
- Keep-alive option
- Logging to file
- Synchronized directory browsing
- Remote file search
Read: Guide to Installing WordPress on PC Localhost [Offline]
How to Install FileZilla FTP Client
To use the FileZilla FTP software you must download and install the software on your computer. Please follow the guide to install FileZilla below:
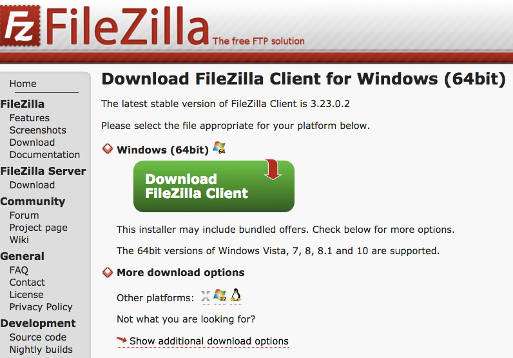
Please visit the official FileZilla site and download the latest version » Download FileZilla .
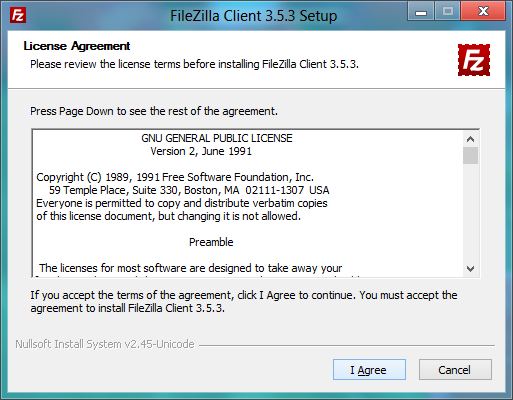
After the file has been downloaded, please click 2X on the file to start the installation process. You will see the License Agreement and click the “I Agree” button.
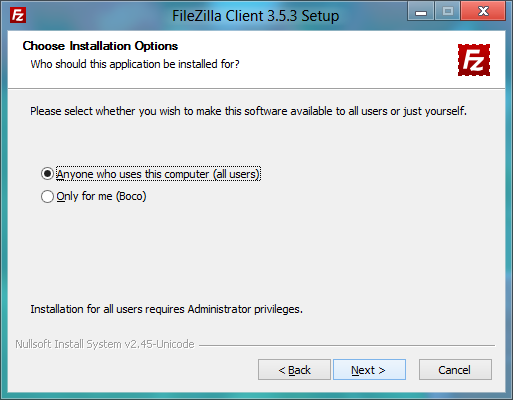
The next step you will need to choose whether you want to install FileZilla for multiple users’ use or just for your own use. In this option I chose “Anyone who uses this computer (all users). and click the “Next” button.
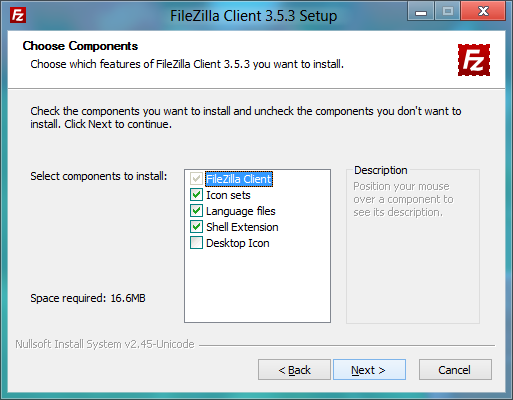
Next you have to select the components of the FileZilla client that you want to install, you can tick all the options. If you have, please click the “Next” button.
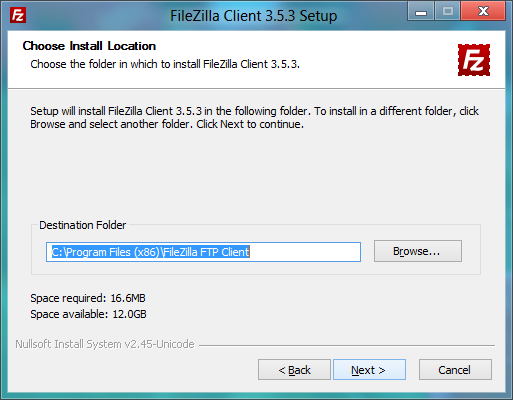
In this step you are asked to determine the location where you want to install the FileZilla software. If you want to set by default, please just click the “Next” button.
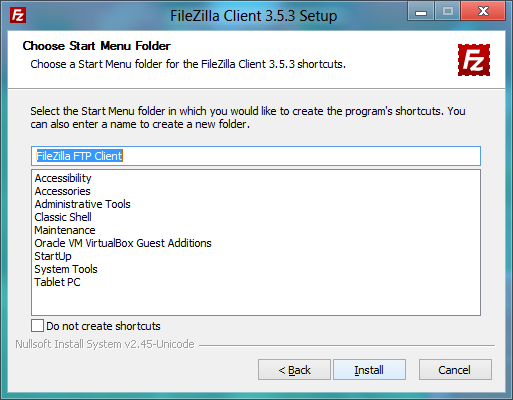
In this section, all you have to do is click the “Install” button and wait for the FTP FileZilla Client installation process to finish until it shows the words “FileZilla Client has been installed on your computer” and click the finish button.
And that’s the easy FileZilla installation process, now you have FileZilla FTP software installed on your computer. Next, please continue reading for how to use the FTP FileZilla Client.
How to use the FileZilla FTP client
To use FileZilla FTP, please open the FileZilla FTP Client software so that it opens as shown below.
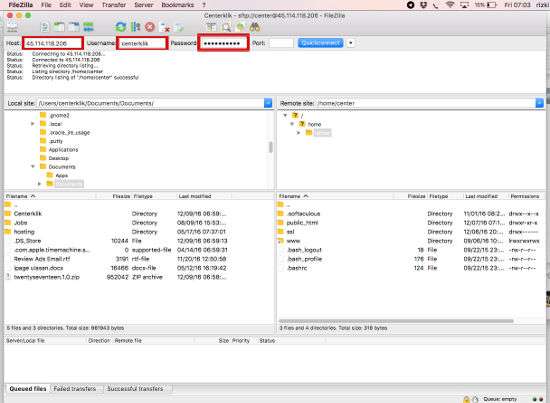
In the picture above you can see the appearance of the FileZilla FTP software. To connect the FTP software with your hosting server, please enter (Host, Username and Password) at the top where I marked red and click the “Quick connect” button. You can get this login information from the hosting service provider that you use and usually when you first purchase your hosting, you will be sent FTP login information included in your email.
If you don’t have FTP login information, feel free to create your own via your hosting control panel, there is an FTP menu. You only need to enter your username and password so you can use the FTP login information. If you are using iPage, you can see the tutorial to create an FTP account here .
After you have successfully connected with your hosting server. You will see a row of folders and files in the right hand column or pane. On the left panel is the contents of your computer and on the right is the content panel of your web hosting server.
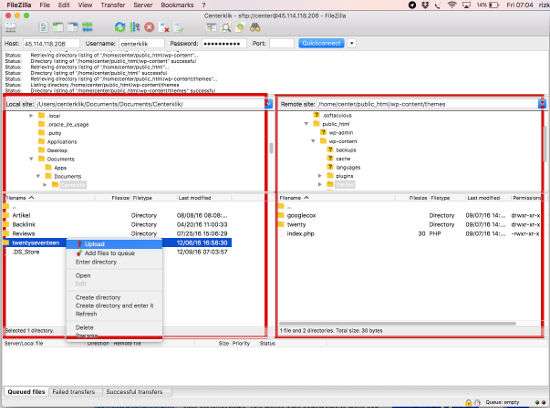
In this example I will try to install a new WordPress theme called ” Twenty Seventeen ” which I have downloaded to my computer and I have extracted (see left panel column) and I will upload it in the “Themes” folder on the right side panel. To enter a folder is to double click on the folder it will open. If the folder position is correct, please right click on the folder you are going to upload and a menu for “Upload” will appear as shown in the picture above. Or you can simply drag and drop files or folders that you want to upload from the left panel to the right panel.
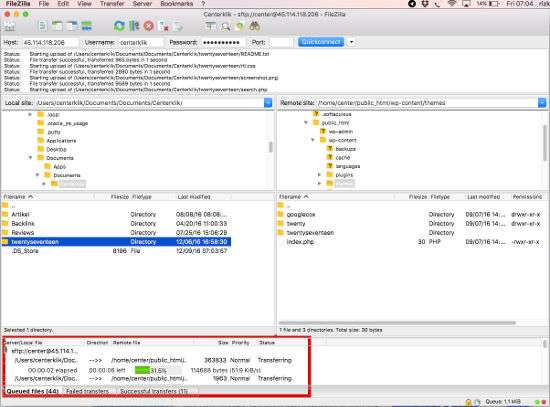
After you click the “Upload” button, the file and folder upload process is now in progress and the upload process status will appear at the bottom as shown above. Please wait until the upload process is finished transferring files. If the process is complete, the upload process status will no longer be seen at the bottom. There you can also see the number of files that were successful in transfer or files that failed to transfer.
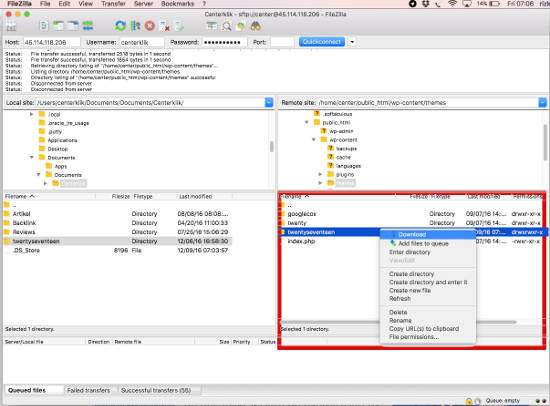
To see if I successfully installed the Twenty Seventeen WordPress Theme via FTP then I immediately logged into my WordPress Dashboard and looked at the Appearance »Themes menu. And below, you can see that the new theme has been installed, which means I have successfully installed the theme via the FileZilla FTP Client.

The image below shows how to download files and folders from a web hosting server to your computer, the process is the same as uploading but reverses from the right to the left pane. There you can also create directories, create files, edit files and change the File Permissions of your website files. With this download method you can use it to back up your site.
Above is a complete guide on how to use FileZilla FTP Client Software from the installation process to using the upload file download process on your web hosting server. Hopefully this article is useful and good luck. 🙂

