


How to Migrate All In One SEO to Yoast SEO . On WordPress you will find two very popular SEO plugins, namely Yoast SEO and All in One SEO. I’ve also previously made a complete tutorial on the configuration guide for the two plugins. You can read it here for a Tutorial Using All In One SEO WordPress .
Previously, I was an All in One SEO user for SEO optimization on my blog and now I have decided to switch to using the WordPress Yoast SEO plugin. The reason I used All in One SEO before is that this plugin is very simple and does not require complicated configurations and for a variety of configurations it is also simple, beginners will certainly be happy with this plugin because it is easy to use.
But, as time went by, I found that there are some configuration parts for SEO optimization that are not in All in One SEO but in Yoast SEO. Actually, there are features that I am looking for, but I have to upgrade to the premium version and Yoast SEO is provided for free.

Yoast SEO is indeed a winner for SEO optimization, because it clearly has many features compared to its competitors and always brings amazing new things to keep up with.
In this article, I will provide a guide for those of you who want to switch or migrate from your old SEO plugin (All in One SEO) or other SEO plugins to the Yoast SEO WordPress plugin.
How to Migrate All in One SEO to Yoast SEO
This guide is actually not only for all in one SEO, but it can also apply to other SEO plugin users who want to migrate to Yoast SEO WordPress.
Previously, the first thing you needed to do before starting to migrate was to backup your WordPress database before you took this action. This is just in case a failure occurs or problems arise.
If so, feel free to install the Yoast SEO plugin and activate it. After that, don’t forget to deactivate (Deactivated) your old SEO plugin (All in One SEO) and don’t delete it before the migration process is complete.

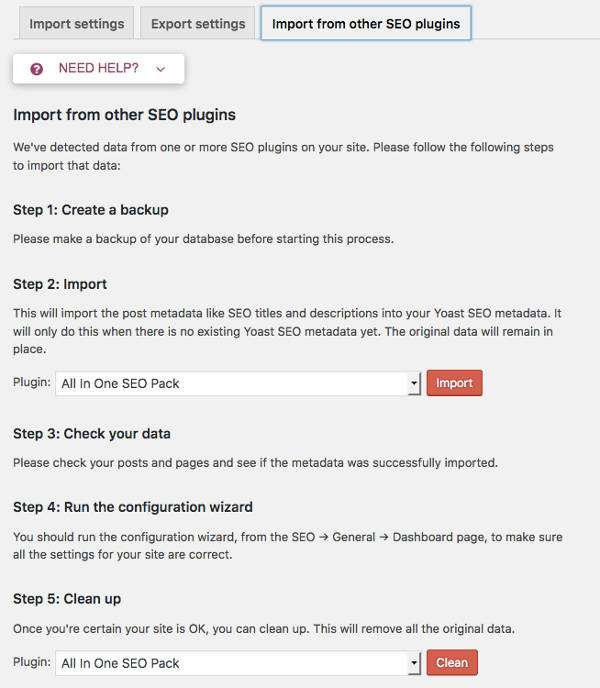
Yoast SEO plugin offers an import export feature, which supports many other popular SEO plugins such as (HeadSpace2, All-in-One SEO, Jetpack SEO, SEOpressor, WooThemes SEO framework and wpSEO).
Click on SEO »Tools» Export and Import.
Now select the tab menu “Import other SEO plugins” and select your old SEO plugin in the “Step 2: Import” section in this case All in One SEO Pack and click the “Import” button.
After the import process is complete, you can check your posts and pages whether the metadata (SEO title and description) for SEO optimization from All in One SEO has actually been successful in moving to Yoast’s SEO configuration.
Next, you can go to the SEO »General» Dashboard . And make sure you solve all the problems and notifications that Yoast SEO suggests you to fix properly. If that’s all done then you can go to the next stage.
Please re-enter the Tools menu »Import from other SEO plugins , and please click the” Clean “button to delete all original data from All in One SEO.
Now, the data migration process from All in One SEO to Yoast SEO is complete. The next step is to remove the All in One SEO plugin from your list of plugins.
And the next step is to configure your site’s SEO in the Search Appearance section. You can read this guide in my article here ⇒ How to Install and Settings SEO Plugin by Yoast [New] .
Apart from that you can also take advantage of the SEO extended plugin to check meta descriptions, titles for all your blog posts and pages. Likewise, if you use any plugins like RSS footer, Robots meta plugin, you can use the import-export feature to import settings into SEO by Yoast plugin, and deactivate those old plugins.
Now you have successfully migrated to Yoast SEO.
The entire migration setup process shouldn’t take more than 10 minutes, but these small changes will improve your blog’s overall SEO score and improve your blog’s SEO ranking in search engines. What’s more, Yoast SEO social features will help you to add many useful features like Twitter meta card, Facebook meta graph meta data.
Urgent
And you need to remember that changes from this SEO migration you need:
- Install the Google Analytics for WordPress by MonsterInsights plugin to install your Google Analytics code, as Yoast SEO does not provide a setup feature for Google Analytics. Or you can also install Google Analytics code without a plugin to make it lighter. Please read the following guide: How to Install Google Analytics on WordPress Manually without a Plugin .
- If you are a Google XML sitemap user then create a sitemap on your WordPress blog. Make sure you delete that too because Yoast SEO already has its own, better xml sitemap. And from before your sitemap URL is like the following
sitemap.xmlnow changed tositemap_index.xml. Feel free to resubmit your new sitemap to Google Webmaster Tools and delete the old one.
And that’s a complete guide on how to migrate from All In One SEO to WordPress Yoast SEO. Make sure you use the Yoast SEO plugin for the optimization of your blog, and also migrate immediately if you still use other SEO plugins.
I highly recommend the Yoast SEO plugin because it is a really complete plugin and if you want to learn how to properly use this plugin, I make sure your blog will have good SEO optimization and can compete in search engines.
And that’s Yoast SEO WordPress Migration, hopefully this article was useful for you, and I hope your blog will be more successful and get better SEO rankings. Good luck 🙂
