


How to Clear DNS Cache on (Mac, Windows, Linux, Chrome) – Have you ever been asked to clear or clear your DNS cache? This is a troubleshooting tip that helps you get the latest version of how websites look, especially after a DNS change.
DNS information tells your browser where to find the website. Your computer stores this information in cache to quickly point the browser in the right direction.
In this article, I will show you how to clear your DNS cache on Mac, Windows, and Chrome computers. This will allow you to easily refresh the DNS records stored on your device and help you troubleshoot your website.
Easily clear DNS cache on macOS, Windows, Linux and Chrome.
What is a DNS Cache?
A DNS cache is like an address book that is stored on your computer with the domain name system (DNS) information of every website you visit.
DNS or Domain Name Server is a technology that tells your computer the IP address associated with the domain name.
Storing DNS information in the local DNS cache helps your browser find websites quickly.
Once you enter a website address in your browser, it will look for DNS information in the local cache first. If it finds directions, it uses the DNS cache to visit websites.
On the other hand, if the information is not in the local DNS cache, the browser will get it from other DNS servers on the internet.
This ensures that whenever you visit any website, your browser will take the shortest route to getting the DNS information it needs to find a website on the internet.
However, this can sometimes cause problems. For example, when you move a WordPress website to a new domain name or when you migrate WordPress to a new hosting .
DNS information may not be updated quickly on your computer, and you may still be visiting old websites or seeing missing errors. It should be updated in a few hours automatically, but why wait when you can clear the DNS cache as soon as possible.
Let’s take a look at how to clear DNS cache on various platforms.
1. How to Clear the DNS Cache in Windows
If you are using a windows computer then this is how you can clear the DNS cache on your windows computer device.
First you need to click on the start button and select the CMD (command prompt) tool.
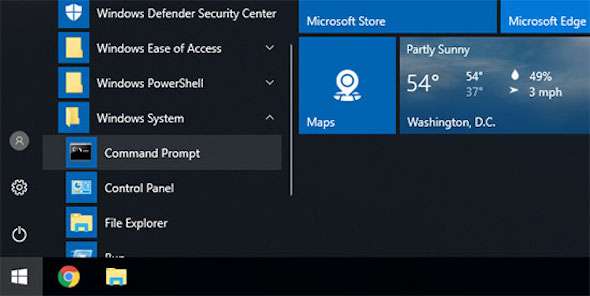
This will launch a command prompt window. Please type the following command:
ipconfig /flushdns
Next press the Enter key to run the command and the Windows system will clear your DNS cache.

That’s all, you can now continue visiting your website to retrieve updated DNS information and you should see your site change in the new DNS.
2. How to clear the DNS cache on macOS
If you are using a MacOS computer, follow the steps below to clear your DNS cache.
First you need to launch the Terminal application. You can find it on Launchpad under the ‘Other’ folder. You can also launch it by opening Finder and going to the Applications »Utilities folder.

This will launch a terminal window where you have to enter the following command.
sudo killall -HUP mDNSResponder
You will be asked to enter your macOS account password. This is the same password that you use to log in to your Mac computer.
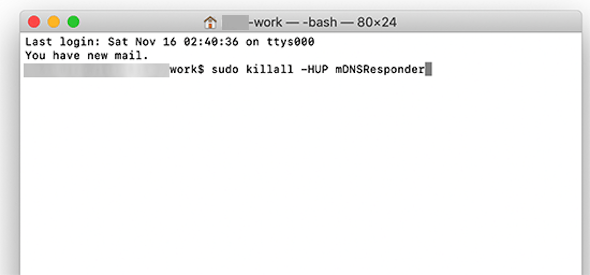
After that, your computer will clear the DNS cache. You can now visit the website for the latest DNS information.
Additional:
If you are using MacOS Catalina or Mojave), you can use the following commands to clear and reset the DNS cache, and these commands may not work on older versions of macOS.
- Open the Terminal application. You can do this fast by running this keyboard shortcut
Command + Space. Then typeTerminal, then pressEnter. - Copy the following command into Terminal, and press
Return.
sudo killall -HUP mDNSResponder; sleep 2;
- Enter your macOS password, and hit
Returnagain. - Exit Terminal using the keyboard shortcut:
Command + Q - And done, now your DNS Cache is now cleared.
3. Clear DNS Cache on Linux
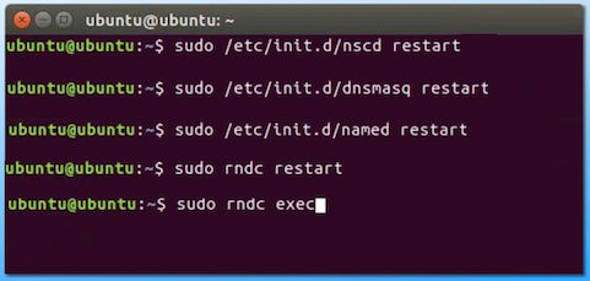
By default, Ubuntu Linux does not create records or store DNS caches. However, if you manually installed a DNS service such as the name service caching daemon (nscd), then you will have to manually delete it to see your DNS updated.
Below are the steps that will show you how to clear or clear the DNS cache on Linux.
Press Ctrl + Alt + T simultaneously to open a terminal window.
Enter the following command to clear the DNS cache file in the init.d subdirectory:
sudo /etc/init.d/nscd restart
Now the DNS cache on your Linux operating system has been cleared and you can see the DNS changes on your website. Or use the full version command as shown below:
4. Clear DNS Cache in Chrome
Google Chrome also keeps a DNS cache of its own, and is separate from the DNS cache stored by your computer’s operating system.
If you are using Google Chrome as the main browser, then you have to clear the DNS cache in Google Chrome as well to get the new DNS Cache.
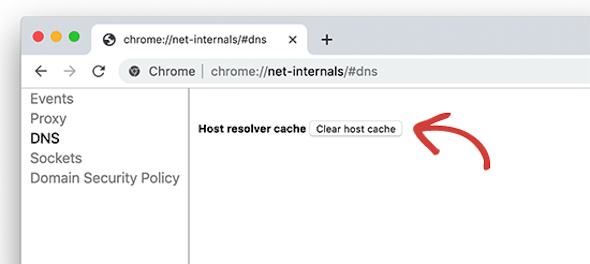
First, you have to enter the following address in the address field of your browser and press enter on your keyboard.
chrome://net-internals/#dns
This will load Chrome’s net internal settings page. From here you need to click on the ‘Clear Host Cache’ button, and Chrome will clear its DNS cache.
Now remember that DNS cache is separate from browser cache.
Your browser stores large amounts of website data in a temporary cache to quickly load pages on subsequent visits.
If you’re having trouble viewing the page you updated but can’t see your changes, then you can clear the browser cache.
I also have a step by step guide on how to clear cache on all popular browsers that you can read about.
How to Check for DNS Updates
When you move or migrate your WordPress website to a new hosting or transfer your domain name to a new domain registrar, you will have to change your DNS settings and point it to a new location.
After you apply these changes under your domain settings, it will take a while for the changes to spread on the internet. This can take anywhere from a few hours to several days.
During this time, your domain will sometimes point to the old location and sometimes it will point to the new location. This depends on your geographic location and which DNS servers your browser asks for.
You can check how these DNS changes are being propagated around the world using an online tool such as DNS Checker .
Just enter your domain name, and it will retrieve DNS from various geographic locations spread all over the world.
If all locations show the same IP address with a green check mark, then this means that the DNS changes you made have now been updated across the internet.
I hope this article helped you learn how to easily clear DNS cache on several different devices like Windows, MacOS, Chrome. You may also want to see my guide on how to clear cache in WordPress .

