How to Place Google AdSense Ads on WordPress . Google AdSense is one of the most popular ways to monetize or make money from your blog or website. Did you know that you can easily attach Google AdSense ads to your WordPress site and start making money? Of course, to post Google AdSense ads is very easy, but what is difficult is being accepted by Google to run the Google AdSense ad program because there are indeed many requirements that are needed to be accepted by Google AdSense and even need luck to be accepted in Google’s advertising program.
But in this article I will not discuss how to be accepted by Google AdSense but in this article I will show you how to create ads and post Google AdSense ad code on WordPress along with sharing some best practices and tips to increase your income from Google AdSense.
Important : In this article I only practice how to install AdSense ads from the “Display Ads” ad type, because this is the type of ad that must be setup manually and the longest ad type from AdSense. You can learn how to post other types of ads such as Auto Ads, In-feed Ads and others in other articles on this blog.
Read: 2 Easy Ways to Set the Position of AdSense Ads in the Middle
What is Google AdSense?
Google AdSense is an advertising network run by Google that allows bloggers and website owners the opportunity to earn money by displaying text, images, videos and other interactive advertisements on their websites. These ads are targeted by site content and audience.
Google AdSense is a free advertising program because you don’t have to deal with advertisers or worry about being charged when registering or running the program. Google manages and maintains relationships with advertisers. They collect payments, partake of Google, and send your share to you via various payment methods such as Western union or Wire Transfer.
How to Get Google AdSense Ad Code
The first thing you need to do is register for a Google AdSense account ( How to register for the Latest Google AdSense ). If you have a Gmail account, then you can use that Gmail account, if you already have a blog ready for you to register with Google AdSense and already have Gmail, please register for Google AdSense here .
After you have submitted your registration form you will receive an email within 6 – 8 hours, Google will inform you whether you have passed the first step of the review process. If you pass this first checking process, then you can log into your AdSense account and get your ad code.
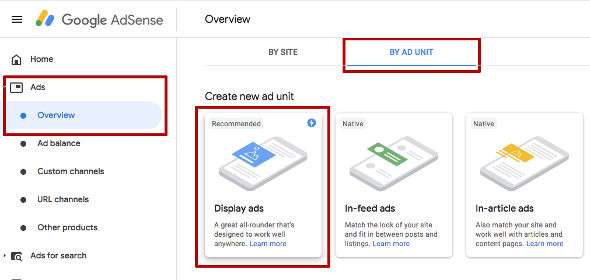
Start by clicking the menu on the left sidebar called ” Ads” and clicking ” Overview “, then clicking the menu tab above ” BY AD UNIT “. You will see that there are about 5 types of AdSense ads displayed. In this example I will choose the ad type ” Display Ads “.
This will take you on a page where you can create a new ad unit. On this page, you can see immediately what type and format of ad you have chosen.
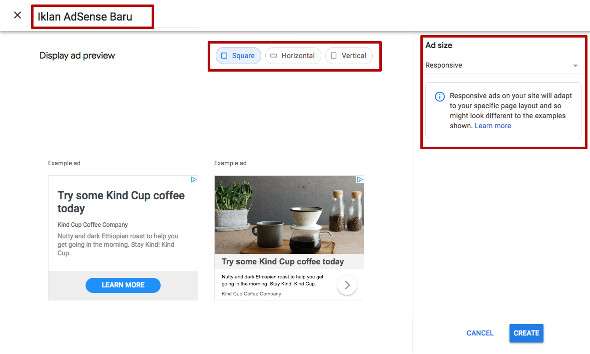
First, write the name of your ad unit at the very top. Make a name according to your wishes, this ad name is only intended to differentiate what type of ad you make.
The next configuration is to choose Display Ad , namely there are 3 forms of advertisements such as Square, Horizontal and Vertical. You can see this form of advertisement directly in the display below.
The next configuration is to choose Ad Size or ad size. Google highly recommends that you choose “Responsive” ads, because this ad size can adjust the size according to the ad area on your WordPress theme, and can change according to the visitor’s device accessing your website. Of course I highly recommend that you choose a responsive size, but if you want to set your own ad size, you just have to click the drop down menu and there will be a “Fixed” option and there is a column to enter the ad size.
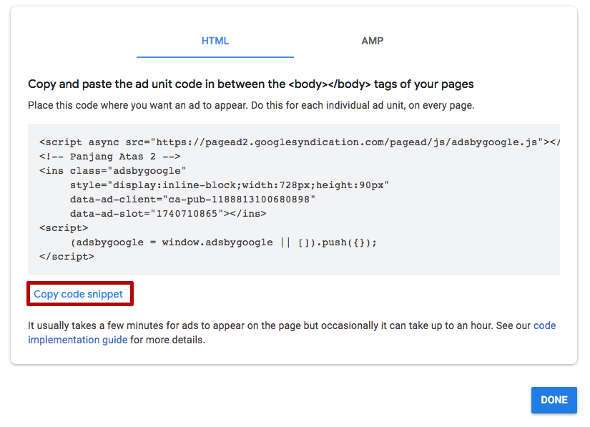
After you are done with your ad configuration, please click the “Create” button and you will see an ad code ready for you to copy and post onto your blog site. There will be two types of ad code, namely HTML and AMP, please copy the code in HTML only, and if your blog site supports AMP, then you can also place the ad code on the WordPress AMP theme.
Copy your ad code and paste it in Notepad as you will need it in the next step. And click “Done” then the new ad unit has been created. You can edit this ad or search for this ad code at any time because the ad unit will be saved in your AdSense account.
Install the Google AdSense Code in WordPress
You need to decide where you want your ads to appear on your website. Most often the ads are displayed on the sidebar. You can add ads to the sidebar by using a WordPress widget.
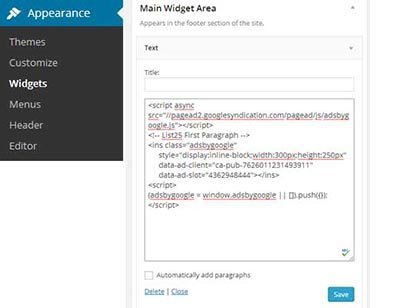
Please login to your WordPress admin area and go to the Appearance »Widgets menu. Next look for the widget list and select “Widget Text” or “HTML Widget” drag & drop the Text widget to the widget area at the right position and paste your Google AdSense code there, if your widget area is a lot of choose the sidebar widget section.
Above is the easiest way to install AdSense code on WordPress, you can place the ad code in the ad area that has been provided by the WordPress theme you are using. However, if your theme doesn’t offer the ad area that suits you. There are still many plugins for placing AdSense ads in strategic areas such as Ad Inserter, Adrotate, WP Quads and many more.
And now you can see your AdSense ads displayed, usually new ads will appear in a few minutes, or make sure to clear the cache on the best browser you use.
Frequently asked questions regarding Google AdSense:
Below are some questions about Google AdSense that are very often asked by bloggers who have just been accepted by AdSense.
Best Adsense Ad Size?
Although ad placement is key, size is also important. Use the best sizes for adsense are 336 × 280 and 300 × 260. These ads tend to fit on most screen sizes and have a high payout rate too, and as I explained above that Google already has responsive sized ads that can adjust according to the user’s device accessing your website or blog, so use responsive size. In addition, you can also try to use advertisements with the type of matched content, which means that they will display advertisements such as related content.
Where is the Best AdSense Revenue?
This depends entirely on the layout of your site. The goal is to get more clicks, so you want to place your ad in a more prominent place. Put article post ads at the top because they tend to get the most clicks. And also in the top sidebar. And there are some who suggest before the article, in the middle of the article or at the bottom of the article.
Can I click on my own ad?
Often newbies are tempted to click on their own ad or ask their family members / friends to click on their ad. And don’t do it. Google’s algorithm is very smart and knows when you click on your own ad. This can get you banned from this program.
Why aren’t my Google AdSense Ads appearing?
Your Google AdSense ad is not appearing maybe because it is still in the second stage of the inspection process, if you pass the second stage then the ad will automatically appear and if you don’t pass the second stage check then you will get an email explaining that your website or blog has not met the requirements and in The email will also explain what your site lacks.
What is Page RPM?
RPM stands for Revenue per Mille, which means revenue per 1000 impressions. It is determined by multiplying the number of clicks and the cost per click and then dividing by the number of pageviews.
How many AdSense Units can be installed?
To be more clear about the answer to this question, I have made a special article which you can read here ⇒ Number of Google AdSense Ads Allowed on Blog Pages
Read: How to Quickly Improve WordPress SEO in Google Ranking
And that’s the article on how to post AdSense ads on WordPress, I hope this article is useful for you. And help you in placing Google AdSense ads on your favorite blog, good luck and success making money from your blog with the Google AdSense advertising program. 🙂
Read: How to Create Email in Gmail with a Computer and HP Smartphone


