


The Complete Guide to How to Setup WordPress Multisite – WordPress has always been growing rapidly from year to year, over the years WordPress has also become a CMS platform that has not moved from the top position and WordPress is the best choice for users around the world because WordPress has powerful features, it is safe and easy to use.
Since WordPress updated to version 3.0, WordPress has brought an amazing feature that has been eagerly awaited by many users, namely the WordPress Multisite feature.
Maybe many of the WordPress users don’t really know what WordPress Multisite is and also maybe just often hear but don’t know how to take advantage of this WordPress feature because WordPress multisite is only for developers, or users who already have more knowledge about WordPress.
In this article I will explain a complete guide on WordPress Multisite, what is WordPress Multisite, who needs to use WordPress Multisite and how to setup WordPress Multisite.
What is WordPress Multisite?
WordPress Multisite is a WordPress feature that allows users to create multiple sites in one WordPress installation. This way you can bypass the need to install WordPress multiple times.
For example, I want to create a news website with various categories separated, such as business news, sports, health, general, etc. with each of these categories differentiated by sub domain names such as (business.WP Radar.com, sports.WP Radar.com) . If you take advantage of the WordPress multisite feature, you don’t need to install WordPress one by one in each of these sub-domains but only need to install WordPress once on the main domain and you can manage all of these sites in one WordPress dashboard by using a username and password. same. And you can create second sites and so on from your original dashboard and utilize the same database with separate files. This is similar to an online news website like detik.com.
Read: Tutorial How to Install WordPress Complete Step by Step [Best Tutorial]
Difference between WordPress Multisite and regular WordPress?
With WordPress multisite, you act as a super admin who manages all network sites in the WordPress multisite network with full control over the main dashboard.
The main WordPress multisite dashboard has a similar appearance to the regular WordPress dashboard and the main difference is that you can assign an admin for each site on your multisite network. And, everyone you make admin will also receive their own dashboard separately for managing the site individually.
The difference between the Super Admin Dashboard and the regular Admin Dashboard is that Super Admins can add new sites and install plugins. While regular Dashboard Admins can choose to activate plugins on their dashboard, they can’t add new plugins of their own to the network as a whole.
Apart from the above differences, with WordPress Multisite you will have many tables in the database, especially since these tables have to be stored separately for each WordPress site. All contents and settings are placed in the table. With a typical WordPress installation you get only 11 tables, but with multisite there are nine of those tables that are duplicated for each additional site you add to a multisite network.
The wp-config.php file will also add a few extra lines of code to tell WordPress Multisite to be installed and the wp-upload folder holds an additional subfolder for each site on the multisite network. So, if you want to access files for a specific site that is in your network, you have to enter a specific subfolder, this is similar to a normal WordPress install, but only in a subfolder.
Who is WordPress Multisite for?
- Educational organizations that want to offer their students to create their own network websites.
- An entrepreneur who has a large blog network.
- An online magazine or online news with several teams and sections.
- A website developer with multiple clients who all need their own site.
- Government with various departments.
- A national and global business with many branches that need their own website.
Who doesn’t need WordPress Multisite?
- Users with accounts that do not meet the web hosting server requirements.
- Each organization requires a regular admin to download and install its own plugins onto individual sites.
- Every organization that requires a unique IP address or database for all sites.
- Developers who have clients with different hosting accounts. Because WordPress Multisite will not work with different hosting.
- Anyone who is only interested in creating one website. For example, I as a personal blogger (with one site) don’t need to install Multisite (except just trying to learn more about WordPress Multisite).
Pros of WordPress Multisite
- Can easily install themes and plugins for multiple sites at once.
- Can easily update like themes or plugins at the click of a button for all sites
- WordPress Multisite allows you to create unique dashboards for each site and site admin.
- Super Admins don’t have to open multiple dashboards. The entire network is housed under one dashboard.
Cons of WordPress Multisite
- You will find that some plugins may not work properly on the WordPress Multisite network.
- A high level of security must be implemented because if one site gets into trouble the whole network will feel the impact.
- The server used must be strong and not the shared hosting type, because if one site experiences a high traffic spike then others will be affected. Even if the server goes down, all sites in the multisite network cannot be accessed.
How to Setup WordPress Multisite
Here are 9 steps you need to follow to create a Multisite website on WordPress:
Step 1: Important things before installing WordPress Multisite
Use quality hosting such as managed WordPress hosting , VPS hosting, Cloud hosting or Dedicated Hosting. You can try to use the best hosting that is specifically recommended by WordPress, namely BlueHost .
Additionally, you should have some knowledge of how to work with an FTP client and how to install a regular WordPress site ( Complete Guide to Using an FTP Client [FileZilla] ).
You will need to choose the domain structure for your network of sites on your multisite. Your choice is between a subdomain and a sub-directory, for example:
- Subdomain: http://port.WP Radar.com/
- Sub-directory: http://WP Radar.com/ sports/
Subdomains require an extra step in configuring subdomains in cPanel, while your sub-directories only need to enable pretty link permalinks.
Step 2: activate the WordPress Multisite feature
The first step is that you must first install WordPress as usual. If you are a new user and this is the first time you want to install WordPress, please read my guide on the complete guide on how to install WordPress.
After the installation on the main site is complete you should make a backup first.
Now open the wp-config.php file and look for the posts
/ * That’s all, stop editing! Happy blogging. * /
and Paste the following code just before writing above:
/ * Multisite * /
define ( 'WP_ALLOW_MULTISITE', true);
After that, save the file to wp-config.php. And now your WordPress site is ready to become WordPress Multisite.
Step 3: Network Configuration
The Multisite feature is now active, but you obviously want to start adding new sites and make sure there are no obstacles during the process.
Now start by deactivating all the plugins that are active on your website. Because this will be annoying if not done.
Then please go to the Tools »Network Setup menu.
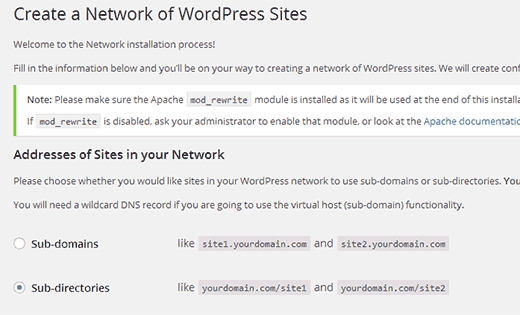
A warning tells you that Apache’s mod_rewrite module must be installed to ensure that Multisite is working. If you have a credible hosting account, of course it must be activated.
Right at the bottom you have to decide whether your network will use a subdomain or a sub-directory. Make a choice depending on your organization, then punch in a title for your entire network. This is also a good time to check if your admin email looks correct.
The final step here is to click the “Install” button.
The next process will be guided by WordPress which will be displayed at each step. You will be prompted to add some rules to your file, which you get complete for the FTP client .
Step 4: Network Settings
The next step is to go to your network dashboard as a Super Admin. This is where you will manage all of your network settings. This is also the only place where you can install plugins or themes for your network.
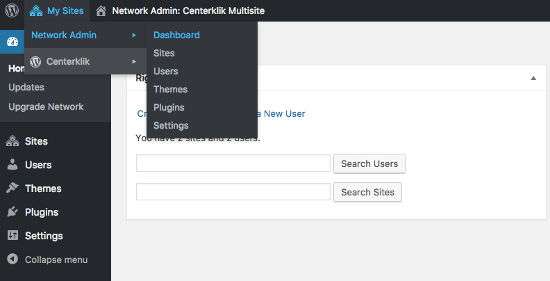
Open the My Site menu on the top left toolbar of WordPress. This will reveal more options in the menu, where you can go to Network Admin »Dashboard.
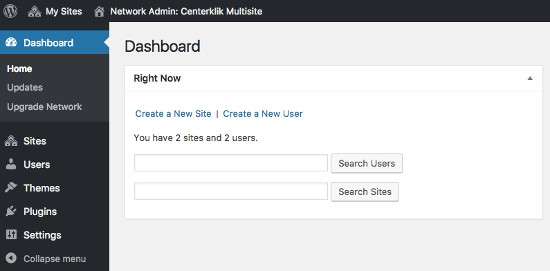
You will now see the Network Admin dashboard, where you will find several new modules for managing your network. There is also a place to create new sites and add users to sites online.
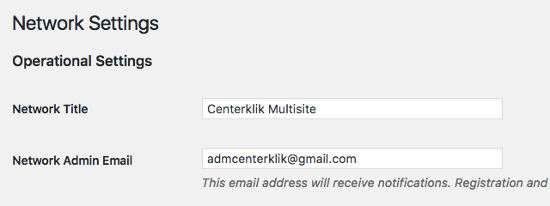
Then click the Settings menu »Networks Settings on the sidebar. And fill in all the necessary details such as Network Title and Network Admin Email.
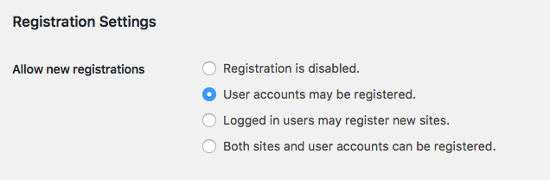
Step 5: Registration Settings
Because this is WordPress Multisite, there will be many admins who will access the dashboard of each of their sites, so please activate the option to accept registration by clicking the “User allow may be registered” option. Because by default this registration is disabled in WordPress Multisite.
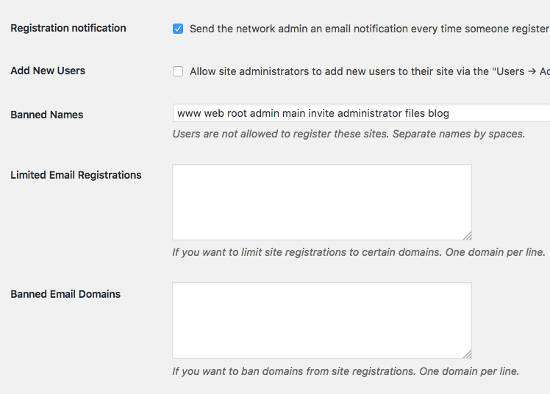
Then activate the option “Registration notification” so that users get email notifications when new users register to create a site.
Check “Add New Users” if you want to allow site admins to add their own users.
You will also be able to customize the Restricted Registration Email settings to prevent some people from registering and also be able to ban user registrations with banned domain emails.
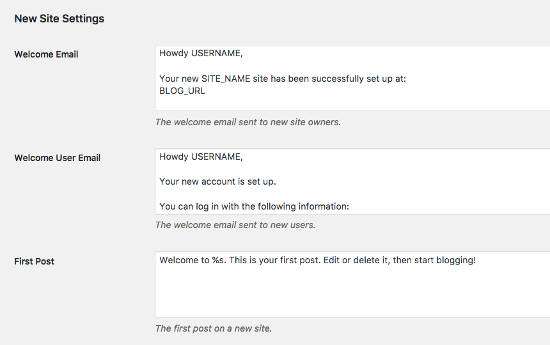
Step 6: New Site Settings
This New Site Settings section allows you to customize the content of the email for each new user who registers for the network to your liking.
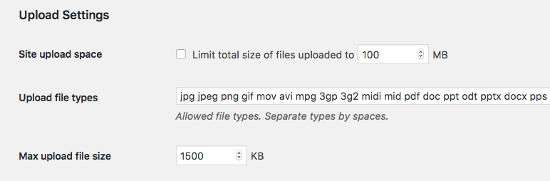
Step 7: Upload Settings
In this section you can set and limit the maximum upload size, upload limit and file types that are allowed to be uploaded for each website on your network.
By limiting this section you can prevent users from being able to upload large video files. We recommend that you only need to limit to 100 MB of storage space per blog or website.
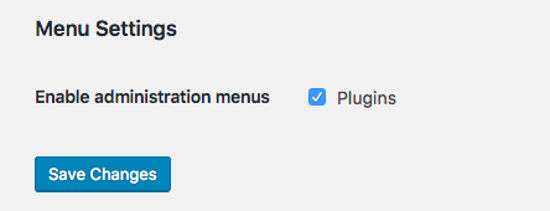
Step 8: Menu Settings
Under the menu settings, you will find the option to “Enable Administration Menus” for the plugins section of the website. Enabling this will show the plugins menu for site admins. They can activate or deactivate plugins on their respective sites, but they cannot install new plugins or remove inactive plugins.
Step 9: Creating a new Site on the Multisite Network
To add a new site to your WordPress multisite, please click the My Site »Network Admin» Site menu in the toolbar.
This will display a list of sites on your current Multisite installation. By default, you have your main site listed as the only site on your WordPress Multisite network. To add a new site, click the “Add New” button at the top.
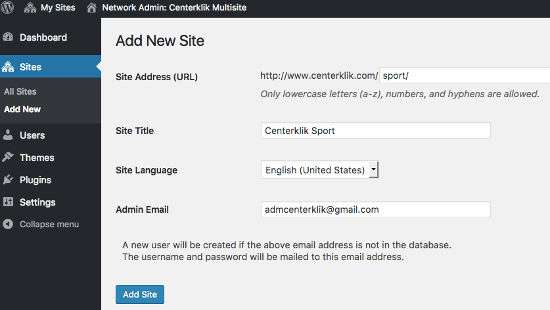
On the New Site page, you need to add a site address. You don’t need to type in the full address, only the part you want to use as a subdomain or sub-directory. After that type the site title, and add the site admin email address.
You can add an admin email address other than the one you are currently using to manage multisite. If the email address is not currently in use by another user on the site, then WordPress will create a new user and send a password and username to the email address you enter.
Once you are done, click on the “Add Site” button.
And now a new site has been added to your multisite network. As the Super admin of your network, you will receive a new site registration email. If you create a new user, the user will receive their username and password along with instructions to login to the email address you provided.
Above is a complete guide on WordPress Multisite, I hope this article is useful for you and adds in-depth knowledge about WordPress Multisite. Good luck 🙂

