Want to know what WP-Cron is, does your site need it or not, and / or how to disable WP-Cron? In this article, I will explain to you everything a casual WordPress user needs to know about WP-Cron.
I will explain what WP-Cron is, how it works, and how you can see all what WP-Cron does or is useful for on your WordPress site. Then, I’ll share some reasons why you might want to disable WP-Cron and replace it with your own time-based system cron. Then, I’ll finish by showing you how to disable it in your cPanel hosting.
What is WP-Cron (wp-cron.php)?
In short, WP-Cron is what WordPress uses to handle scheduled time-based tasks in WordPress.
For example, if you schedule a post in advance for publication next Tuesday at 6 am, then WP-Cron is responsible for ensuring that the post actually goes live at that time. Or, if you schedule weekly database cleanups via your favorite database optimization plugin , WP-Cron takes care of that too.
Basically, WP-Cron is in charge of handling matters related to time and scheduling.
It gets its name from the cron schedule system on Unix-like operating systems. With this system level cron, you can run tasks automatically on a schedule that you define.
How, despite having the same name, WP-Cron is separate and distinct from the tools.
WP-Cron isn’t just for actions you schedule – many WordPress plugins also rely on WP-Cron to schedule their own tasks to run. For example, if you are using WooCommerce, there are many backend processes that rely on WP-Cron to run.
How Does WP-Cron Work?
WP-Cron relies on visits to your site to function, which leads to one of its biggest limitations. Every time you or someone else visits your WordPress site (either backend or front-end), WordPress runs wp-cron.php and checks the scheduled tasks. If there is a scheduled task, WordPress will process it.
But that’s the key – if there are no visitors, nothing triggers the task, which means it won’t run until there is a visit.
How to View WP-Cron Tasks
If you want to view and manipulate all the tasks that WP-Cron handles on your WordPress site, there is a very neat (and free) plugin called WP Crontrol . Once you have installed and activated the plugin from WordPress.org, you can go to Tools → Cron Events to view all scheduled tasks on your WordPress site and how often / when they are executed. You can also run it manually if necessary.
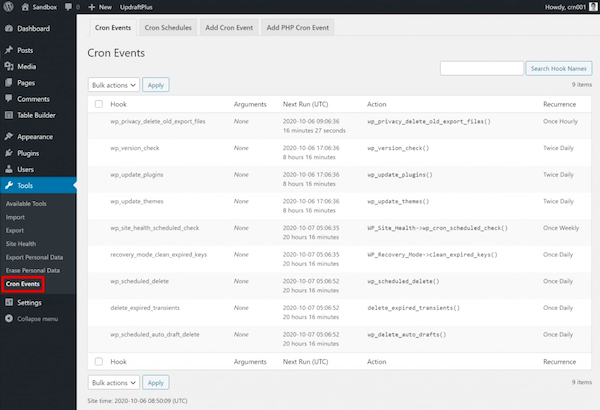
If you go to the Cron Schedules tab, you can view all the different time schedule intervals, and create your own. WP Crontol will also tell you where the schedule came from if you hover over it:
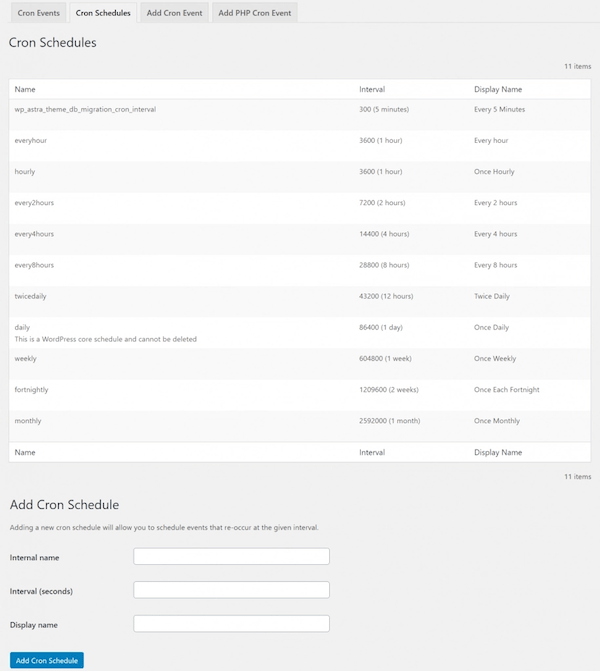
Lastly, if you want to get really crazy, you can also create your own cron events from the Add Cron Schedules or Add PHP Cron Event tabs.
Read: How to Disable Windows Defender Antivirus in Windows 10
Why should you disable WP-Cron?
There are several reasons why you might want to disable WP-Cron and replace it with Real system Cron (from your server ).
1. WP-Cron Is Not Always Reliable
One of the biggest limitations with WP-Cron is that it requires a visit to work. Again, these visits could be front-end visits from other users or it could be your own visits while you are working on the dashboard. But no matter what, WP-Cron needs a visit to work, otherwise your scheduled task won’t run.
If you have a high traffic site this is not a problem as you will always get people to go to your site (which will allow WP Cron to run). But for low-traffic sites, this can cause real problems.
For example, suppose you scheduled posts to go live at 5 p.m., but your site doesn’t receive visitors until 8 p.m. This means that the post will not air until 8:00 p.m. because it is WP Cron’s first chance to carry out the task.
Now, this might not be a big deal for blog posts, but this limitation will also affect all other time-based tasks on your site (like automatic updates, backups, cleanup, etc.).
With Real System Cron based or Real System Cron, you can configure it so that these tasks are triggered every X minutes like clockwork, regardless of whether your site has visitors or not, which is a much more predictable and reliable way to handle tasks. time based.
Read: Effective Ways to Disable or Disable Windows 10 Updates
2. Can Reduce Performance
If you have a high-traffic site, the first reason doesn’t apply to you. Why? Because if you have people visiting all the time, WP-Cron will have plenty of opportunities to run and you won’t miss any tasks.
But that leads to another potential problem – namely performance. By default, wp-cron.php will be enabled on every page load, which can be a performance bottleneck. WordPress does try to limit this by not sending additional requests more than once per 60 second period. However, if your site receives multiple requests at the same time, this can still lead to multiple requests to wp-cron.php.
Also, even with the 60 second limit, it’s unlikely that your site will have a task that needs to run every 60 seconds. Usually, a longer schedule, like every 15 minutes, is still fine.
Essentially, WP-Cron can be a problem for low-traffic and high-traffic WordPress sites, albeit for different reasons.
Read: The Complete Guide to Disabling WordPress Comment Fields
How to deactivate WP-Cron (and replace it with a real cron job)
Now, let’s discuss how to disable WP-Cron and replace it with your own system cron.
To be clear, this doesn’t mean time-based tasks will stop working on your site. This means that instead of relying on visits to trigger WP-Cron, you can use a much more reliable time-based system.
You can also adjust the frequency to meet your needs. A good starting point is to have it run every 15 minutes, but you may also want to do it every 30 minutes if you’re on cheap hosting .
If you set it to 15 minutes, your site will run all time-based tasks every 15 minutes no matter what. You can have 500 visits or zero visits – after all, your job will still be executed every 15 minutes.
There are two parts to disabling WP-Cron:
- Disable WP-Cron in your wp-config.php file.
- Set up your own system cron to load wp-cron.php on a schedule you define.
As always, I recommend that you create a backup on your site before proceeding as you will be editing the wp-config.php file.
Read: How to Deactivate Gutenberg and Switch to the Old WordPress Editor
1. Disable WP-Cron in the wp-config.php file
After you’ve backed up your site, connect to your site via FTP or something like cPanel File Manager.
Then, find and edit the wp-config.php file, which is usually in the root folder of your site.
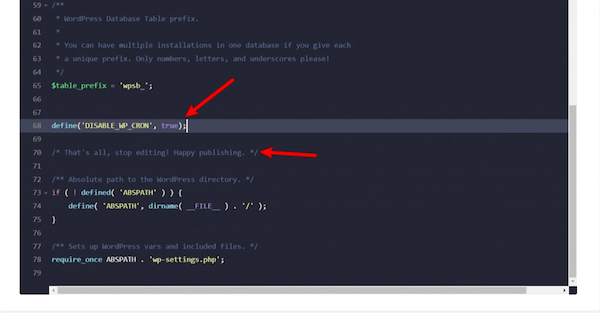
Add the following code snippet above the line that reads /* That's all, stop editing! Happy publishing. */ :
define('DISABLE_WP_CRON', true);
2. Configure your System Cron
Now, you need to set up your own system cron to run wp-cron.php – otherwise none of your WordPress site’s time-based tasks will run.
How you do that will depend on your host, but I’ll show you what it looks like in cPanel. If you get stuck, you can contact the support department of the best hosting you are currently using for assistance.
First, look for a tool called Cron Jobs , or something similar:
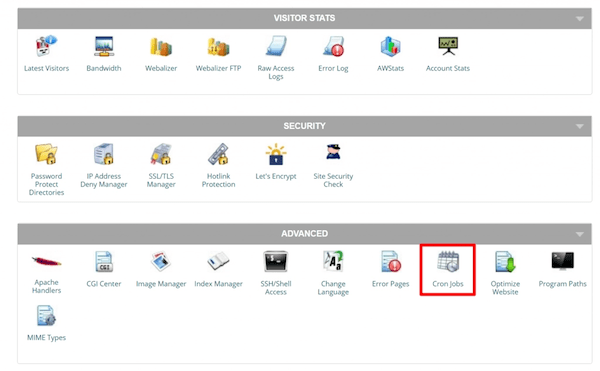
Now, you’ll see an interface that will allow you to set a schedule for your cron job, as well as the commands you want to run. In cPanel, you should be able to use the General Settings drop-down menu to select a schedule. Otherwise, you’ll need to follow the cron syntax to set up the schedule. In the latter scenario, Crontab.guru makes it very easy to generate the necessary syntax.
Again, running it every 30 minutes is a good starting point for cheap hosting . You can open more or less frequently depending on your needs, but most sites don’t need to be opened more often than every 15 minutes.
Once you’ve set the schedule, enter the following code snippet in the Command section. Make sure to replace https://yourdomain.com with your own domain name.
wget -q -O - http://yourdomain.com/wp-cron.php?doing_wp_cron >/dev/null 2>&1
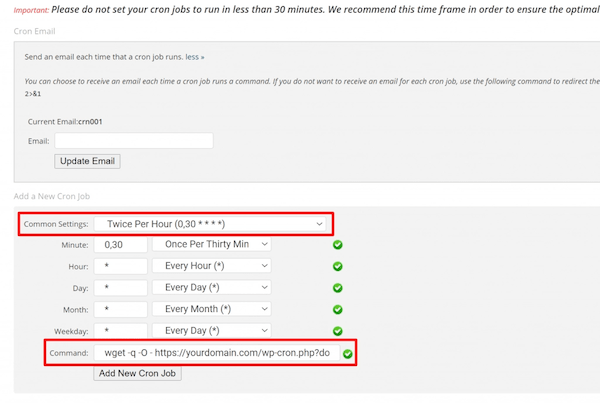
Then, click Add New Cron Job and you are ready to jet! You will see it appear in the current Cron Jobs section. If necessary, you can always edit or delete cron jobs from that section:
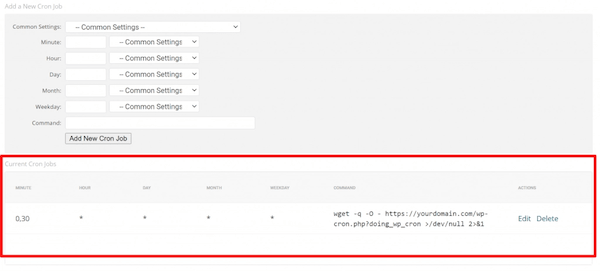
I recommend installing WP Crontrol to make sure that your scheduled task is still working. If there is a task that cannot be executed, WP Crontrol will highlight it. You can ignore warnings about WP-Cron being disabled.
Done! You just officially disabled WP-Cron and replaced it with your own system-based cron job.
Can’t Set Up a Cron Job on Your Hosting? Use Third Party Services
If you are unable to set up a cron job on your web hosting, or if you are usually confused about your hosting interface, you can also use a third party service. Some of the popular options are:
- EasyCron (paid with limited free plan)
- SetCronJob (paid)
- cron-job.org (free)
All you need to do is use one of these services to run the same command from the previous section.
Disable WP-Cron (wp-cron.php) Today
WP-Cron plays an important role in controlling the time based tasks on your WordPress site. However, this default way of working is unreliable for low-traffic sites and can sometimes cause performance issues for high-traffic sites.
For that reason, you should consider disabling the default system and replacing it with your own time-based system cron. To do that, all you need to do is follow the steps in this article.


